- Image and Video Editing: Feedbacks/Queries -

Video-Image Editing
Methods and Scripts to Edit Images and Videos
Table of Contents
- Pixels, DPI, PPI and Screen Resolution |:| Digit Recognition and ANN MLP classifications --- Computer Vision | Image Editing using ImageMagick |:| Unsharp Mask [] Image Denoising using ML |*| Rasterize and Vectorize --- Convolution, Edge Detection, Sobel kernel, Smoothen, Sharpen and Intensify Images
- Video Editing --- Image Filtering, Masking and Denoising ---Image Deskewing -|- Audio and Video Codecs | Video Editing using FFmpeg | Simple Rescaling | Create Videos from Images |:| Timeline editing and trimming |:| Crop videos | Overlay videos |:| Concatendate videos | Pillarboxing: add padding to videos |-| Color Effects |:| Freeze Effect [] Overlay videos using MoviePy --- Animations like PowerPoint |:| Box Transition Effect !! Cube Transition |=| Arrow Transition --- Animations using Blender -|- Image and Video Editing using OpenCV |+| PowerBI and Pivot Table
Computer Vision: OpenCV
Image processing is an integral part of computer vision. OpenCV (Open-source Computer Vision Library) is an open source computer vision and machine learning software library. It integrates itself seamlessly with Python and NumPy. In can be installed in Python 3.5 for Windows by command: C:\Windows\System32>py.exe -m pip install -U opencv-python. One can check the version by statement "print(cv2.__version__)" in Python. Python also has a library for image processing called 'Pillow'. Big difference between skimage imread and opencv is that it reads images as BGR instead of RGB (skimage). This link: github.com/BhanuPrakashNani/Image_Processing contains a detailed list (approx 35) of image processing methods and Python codes.- cv2.IMREAD_COLOR: Loads a color image. Any transparency of image will be neglected. It is the default flag. Same as cv2.imread("image_01.png", 1)
- cv2.IMREAD_GRAYSCALE: Loads image in grayscale mode, same as cv2.imread("image_01.png", 0)
- cv2.IMREAD_UNCHANGED: Loads image as such including alpha channel, same as cv2.imread("image_01.png", -1)
- Instead of these three flags, you can simply pass integers 1, 0 or -1 respectively as shown above
- OpenCV and skimage directly store imported images as numpy arrays
- Maintain output window until user presses a key or 1000 ms (1s): cv2.waitKey(1). cv2.waitKey(0) display the window until any key is pressed.
- Destroys all windows created: cv2.destroyAllWindows()
NumPy and SciPy arrays of image objects store information as (H, W, D) order - also designated as axis=0, axis=1 and axis=2 respectively. The values can be transposed as img = transpose(-1, 0, 1) = (D, W, H) = transpose(2, 0, 1). Here, (H, W, D) can be access either by (0, 1, 2) or (-3, -2, -1).
| S. No. | Operation | OpenCV Syntax |
| 01 | Open or read Image | im = cv2.imread("img/bigData.png", 1) |
| 02 | Save or write Image | cv2.imwrite("Scaled Image", imgScaled) |
| 03 | Show or display Image: First argument is window name, second argument is image | cv2.imshow("Original image is", im) |
| 04 | Resize or scale Images | imgScaled = cv2.resize(im, None, fx=2, fy=2, interpolation = cv2.INTER_CUBIC) |
| 05 | Convert images from BGR to RGB | imgRGB = cv2.cvtColor(im, cv2.COLOR_BGR2RGB)* |
| 06 | Show only blue channel of Image | bc = im[:, :, 0]; cv2.imshow("Blue Channel", bc) |
| 07 | Show only green channel of Image | gc = im[:, :, 1]; cv2.imshow("Green Channel", gc) |
| 08 | Show only red channel of Image | rc = im[:, :, 2]; cv2.imshow("Red Channel", rc) |
| 09 | Split all channel at once | bc,gc,rc = cv2.split(im) |
| 10 | Merge channels of the Image | imgMrg = cv2.merge([bc, gc, rc]) |
| 11 | Apply Gaussian Smoothing (Filter) | imgGauss = cv2.GaussianBlur(im, (3,3), 0, borderType = cv2.BORDER_CONSTANT) |
| 12 | Edge detection | imgEdges = cv2.Canny(img, 100, 200) where 100 and 200 are minimum and maximum values |
| 13 | Median Blur | imgMedBlur = cv2.medianBlur(img, 3): kernel size should be an odd number |
| 14 | Get dimensions of an image | height, width, channels = img.shape, channels = img.shape[2] |
* hsvImg = cv2.cvtColor(im, cv2.COLOR_BGR2HSV); h, s, v = cv2.split(hsvImg) and labImg = cv2.cvtColor(im, cv2.COLOR_BGR2LAB); L, A, B = cv2.split(labImg). Here, HSV stands for Hue, Saturation, Value and LAB - Lightness, A (Green to red), B (Blue to Yellow). Hue is the basic color, like red, green, or blue, while saturation is how intense the color is. A grayscale or black-and-white photo has no colour saturation - highly saturated images may look artificial while dealing with natural looks such as plants. img_blurred = cv2.blur(image, (5, 5)) where (5, 5) is the kernel size.
To read-write images: from skimage import io, to apply filters: from skimage import filters or from skimage.filters import gaussian, sobel.
| S. No. | Operation | skimage Syntax |
| 01 | Open or read Image | im = io.imread("img/bigData.png", as_gray=False) |
| 02 | Save or write Image | io.imsave("Scaled Image", imgScaled) |
| 03 | Show or display Image | io.imshow(im) |
| 04 | Resize or scale Images | imgScaled = rescale(img, 2.0, anti_aliasing = False), imgSized = resize(img, (500, 600), anti_aliasing = True) |
| 05 | Convert images from BGR to RGB | imgRGB = cv2.cvtColor(im, cv2.COLOR_BGR2RGB)* |
| 06 | Show only blue channel of Image | bc = im[:, :, 0]; cv2.imshow("Blue Channel", bc) |
| 07 | Show only green channel of Image | gc = im[:, :, 1]; cv2.imshow("Green Channel", gc) |
| 08 | Show only red channel of Image | rc = im[:, :, 2]; cv2.imshow("Red Channel", rc) |
| 09 | Split all channel at once | bc,gc,rc = cv2.split(im) |
| 10 | Merge channels of the Image | imgMrg = cv2.merge([bc,gc,rc]) |
| 11 | Apply Gaussian Smoothing (Filter)** | imgGauss = filters.gaussian(im, sigma=1, mode='constant', cval=0.0) |
| 13 | Median Blur*** | imgMedBlur = median(img, disk(3), mode='constant', cval=0.0) |
| 14 | Get dimensions of an image | w = img.size[0], h = img.size[1] |
** 'sigma' defines the std dev of the Gaussian kernel, different from cv2. In general, standard deviation controls size of the region around the edge pixel that is affected by sharpening. A large value results in sharpening of a wider region around edge and vice versa.
**** from skimage.morphology import disk
Image and Video Enhancement
Before proceeding to Enhancement, let's explore the image basics first: Brightness, Contrast, Alpha, Gamma, Transparency, Hue, Saturation... are few of the terms which should be clearly understood to follow the techniques used for image enhancements. Brightness: it refers to depth (or energy or intensity) of colour with respect to some reference value. Contrast: the difference between maximum and minimum pixel intensity in an image. The contrast makes certain portion of an image distinguishable with the remaining.
Some operations generally performed on images are flip, crop, trim, blur, invert, overlay, mask, rotate, translate, pad, compress, expand... and combination of these. For example, to translate the image towards right keeping the image size constant is a combination of crop and pad operation. Sharpness is contrast (difference) between two different colours. It enhances definition of edge in an image where quick transition from one colour to another convey human vision a 'sharp' change.
Convolution: This is special type of matrix operation defined below. Convolution is the most widely used method in computer vision problems and algorithms dealing with image enhancements. There matrix 'f' is known as convolution filter or kernel, which is usually 'odd' in size. Strictly speaking the method explained here is cross-correlation. However, this definition is widely used as convolution in machine language applications.
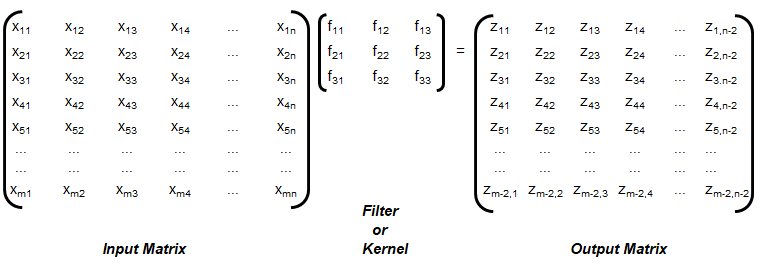
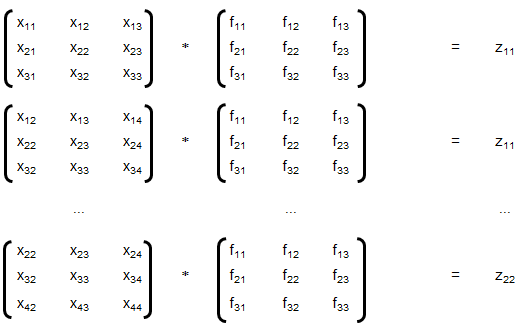
The convolution explained above is known as 'valid', without padding. Note that the size of output matrix has reduced by 2 in each dimension. Sometimes, padding is used where elements or layers of pixels are added all around, that is p rows and p columns are added to the input matrix with (conventionally) zeros. This helps get the output matrix of same size as that of input matrix. This is known as 'same' convolution. Similarly, the "strided convolution" use matrix multiplications in 'strides' or 'steps' where more than 1 rows and columns are stepped in the calculation of zij.
Convolution is a general method to create filter effect for images where a matrix is applied to an image matrix and a mathematical operation (generally) comprising of integers. The output after convolution is a new modified filtered image with a slight blur, Gaussian blur, edge detection... The smaller matrix of numbers or fractions that is used in image convolutions is called a Kernel. Though the size of a kernel can be arbitrary, a 3 × 3 is often used. Some examples of filters are:
Following OCTAVE script produces 7 different type of images for a given coloured image as input.
The Sobel kernel may not be effective at all for images which do not have sharp edges. The GNU OCTAVE script used to generate these image enhancements and convolutions is described here.%In general Octave supports four different kinds of images % gray scale images|RGB images |binary images | indexed images % [M x N] matrix |[M x N x 3] array |[M x N] matrix | [M x N] matrix %class: double |double, uint8, uint16 |class: logical | class: integer %The actual meaning of the value of a pixel in a grayscale or RGB image depends %on the class of the matrix. If the matrix is of class double pixel intensities %are between 0 and 1, if it is of class uint8 intensities are between 0 and 255, %and if it is of class uint16 intensities are between 0 and 65535. %A binary image is an M-by-N matrix of class logical. A pixel in a binary image %is black if it is false and white if it is true. %An indexed image consists of an M-by-N matrix of integers and a Cx3 color map. %Each integer corresponds to an index in the color map and each row in color %map corresponds to an RGB color. Color map must be of class double with values %between 0 and 1.
The elements of a kernel must sum to 1 to preserve brightness: example of valid kernels are kernel_1 = np.array([ [-1, -1, -1], [-1, 9, -1], [-1, -1, -1] ]) ≡ kernel_2 = 1/9*np.array([ [1, 1, 1], [1, 1, 1], [1, 1, 1] ]). gauss_kernel = 1/16 * np.array([ [1, 2, 1], [2, 4, 2], [1, 2, 1] ]). Unweighted smoothing, weighted smoothing (Gaussian blur), Sharpening and Intense Sharpening Kernels respectively are described below
|1   1   1|      |0   1   0|      | 0   -1     0|     |-1   -1   -1|
|1   1   1|      |1   4   1|      |-1    5    -1|     |-1    9   -1|
|1   1   1|      |0   1   0|      | 0   -1     0|     |-1   -1   -1|
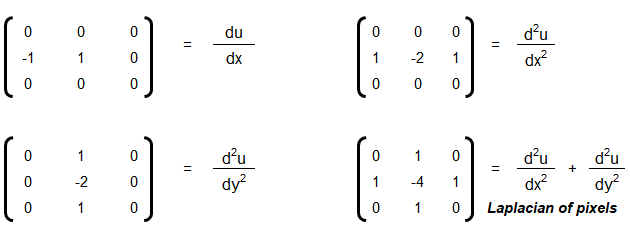
Laplacian Filter: Laplacian filter often refers to the simple 3 × 3 FIR (Finite Impulse Response) filter. The zero-crossing property of the Laplacian filter is used for edge location.
[ 0  −1   0
 −1   4  −1
  0  −1   0]
There are many other filters such as Sepia effect filter, Emboss effect, Mexican hat filter. filter_mex_hat = np.array([ [0, 0, -1, 0, 0], [0, -1, -2, -1, 0], [-1, -2, 16, -2, -1], [0, -1, -2, -1, 0], [0, 0, -1, 0, 0] ]) mexican_hat_img = cv2.filter2D(img, -1, filter_mex_hat). sepia_kernel = np.array([ [0.272, 0.534, 0.131], [0.349, 0.686, 0.168], [0.393, 0.769, 0.189] ]). sepia_img = cv2.transform(img, sepia_kernel).
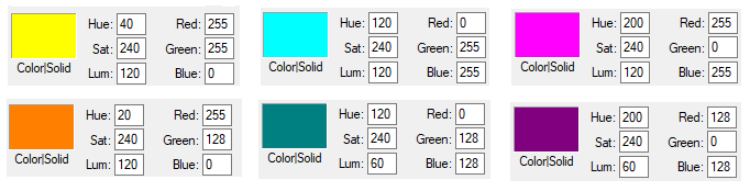
Some standard colours and combination of RGB values are described below. These values can be easily studied and created using MS-Paint, edit colours option.
Pixels, DPI, PPI and Screen Resolution
As explained above, images are stored as pixels which are nothing but square boxes of size (in classical definition) 1/72 x 1/72 [in2] with colour intensity defined as RGB combination. However, the dimensions of a pixel are not fixed and is controlled by Pixels per Inch (PPI) of the device. Thus, size of pixel = physical size [inches] of the display / PPI of the display. Or PPI of a display device = 1/(Screen Size) x [(Horizontal Pixels)2 + (Vertical Pixels)2]0.5. Following pictures demonstrate the concept of pixels used in computer through an analogy of colour boxes used by the artist in MS-Excel.
![]()
![]()

NumPy and SciPy arrays of image objects store information as (H, W, D) order (also designated as axis=0, axis=1 and axis=2 respectively. The values can be transposed as img = transpose(-1, 0, 1) = (D, W, H) = transpose(2, 0, 1). Here, (H, W, D) can be access either by (0, 1, 2) or (-3, -2, -1). The EGBA format of image adds alpha channel to describe opacity: α = 255 implies fully opaque image and α = 0 refers to fully transparent image. On a grayscale image, NumPy slicing operation img[:, 10:] = [0, 0] can be used to set 10 pixels on the right side of image to '0' or 'black'. img[:, :10] = [0, 0] sets 10 pixels on the left column to '0'.
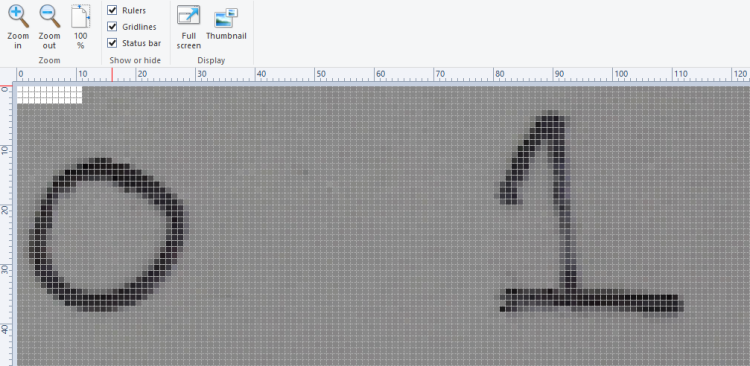
The images when read in OCTAVE and pixel intensities converted into a text file results in following information. Note that the pixel intensity in text file is arranged by walking though the columns, that is the first 76 entries are pixels in first column in vertical direction.
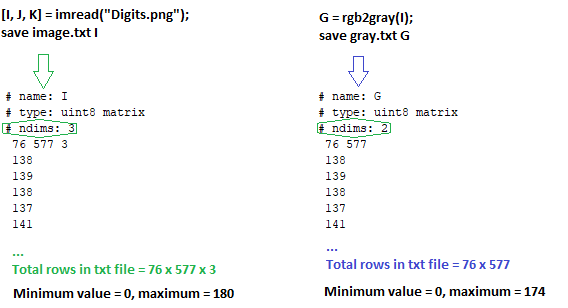
Even though the text file contains one pixel intensity per row, the variables I and G are matrices of size 76 x 577 x 3 and 76 x 577 respectively. The rows with entries "76 577 3" and "76 577" are used to identify the size of the matrices. The portion of image from row numbers from 100 to 250 and column numbers from 500 to 750 can be accessed as image_cropped = image[100:250, 500:750].
As explained earlier, type uint8 stands for unsigned (non-negative) integers of size 8 bit and hence intensities are between 0 and 255. The image can be read back from text file using commands: load("image.txt"); imshow(I); Note the text file generated by this method contains few empty lines at the end of the file and should not be deleted. The text file should have at least one empty line to indicate EOF else it will result in error and the image will not be read successfully.warning: imshow: only showing real part of complex image
warning: called from
imshow at line 177 column 5
Now, if the pixel intensities above 100 are changed to 255, it results in cleaned digits with sharp edges and white background. In OCTAVE, it is accomplished by statement x(x > 100) = 255. In Numpy, it is x[x > 100] = 255. You can also use & (and) and | (or) operator for more flexibility, e.g. for values between 50 and 100: OCTAVE: A((A > 50) & (A < 100)) = 255, Numpy: A[(A > 50) & (A < 100)] = 255. For a copy of original array: newA = np.where(A < 50, 0, A)


Attributes of Image Data
The images has two set of attributes: data stored in a file and how it is displayed on a device such as projectors. There are terms such as DPI (Dots per Inch), PPI (Pixels per Inch), Resolution, Brightness, Contrast, Gamma, Saturation... This PDF document summarizes the concept of DPI and image size. An explanation of the content presented in the PDF document can be viewed in this video file.
The video can be viewed here.Image File Types: PNG-8, PNG-24, JPG, GIF. PNG is a lossless format with option to have transparency (alpha channel). JPG files are lossy format and quality can be adjusted between 0 to 100%. JPG file cannot have transparency (alpha channel). PNG-8 or 8-bit version of PNG is similar to GIF format which can accommodate 256 colours and this format is suitable for graphics with few colours and solid areas having discrete-toned variation of colours. PNG-24 is equivalent to JPG and is suited for continuous-toned images with number of colours > 256. In effect, a JPG file shall have lesser size (disk space) than PNG with nearly equal or acceptable quality of the image. Screenshots should be saved as PNG format as it will reproduce the image pixel-by-pixel as it appeared originally on the screen.
This Python code uses Pillow to convert all PNG files in a folder into JPG format.
Image Filtering and Denoising
Image filtering is also known as Image Masking. The masking process is similar to a 'mask' or 'cover' we use for our body parts such as face. There are various types of noises that gets into scanned images or even images from digital camera. Gaussian, salt-and-pepper... are few of the names assigned to the type of noises. The concepts applicable to image enhancements are Edge Enhancement = Edge Sharpening, Convolution Filters, Remove Reflection, Glare and Shadow Removal, See-through corrections (visible text of underlying page), Despeckle, Smudge and Stains removal, JPEG compression artefacts, GIF compression pixelization and dot shading...CLAHE (Contrast Limited Adaptive Histogram Equalization) - worked well with for local contrast enhancement. Using different color space, such as HSV/Lab/Luv instead of RGB/BGR helps remove glares. The methods applicable to Document Imaging Applications (scanned texts) may not be effective to Photographic Image Applications (such as X-ray and Computer Tomography Scan images). Some of the requirements of denoising are removal of small noises, deletion of random or lonely pixels, thinning of characters of text in an image... The method to denoise or remove imperfections in an image is generally a two-step process: image segmentation followed by morphological operations.Denoising using skimage, OpenCV: This Python code uses Total Variance method to denoise an image. This method works well for random Gaussian noises but may not yield good result for salt and pepper noise.
| PIL | OpenCV |
| ImageFilter.BLUR | cv2.blur(src, kszie) |
| ImageFilter.MaxFilter(ksize) | cv2.dilate |
| ImageFilter.DETAIL | cv2.filter2D |
| ImageFilter.EDGE_ENHANCE | cv2.Sobel, cv2.Scharr, cv2.Laplacian, cv2.Canny |
| PIL.ImageFilter.EDGE_ENHANCE_MORE | |
| PIL.ImageFilter.EMBOSS | cv2.filter2D |
| PIL.ImageFilter.FIND_EDGES | cv2.Canny |
| PIL.ImageFilter.SMOOTH | cv2.GaussianBlur, cv2.MedianBlur, cv2.bilateralFilter |
| PIL.ImageFilter.SMOOTH_MORE | cv2.GaussianBlur, cv2.MedianBlur, cv2.bilateralFilter |
| PIL.ImageFilter.SHARPEN | cv2.filter2D |
| PIL.ImageFilter.GaussianBlur(radius) | cv2.GaussianBlur(src, ksize, sigmaX) |
This code uses Non-Local Mean (NLM) Algorithm to denoise an image. This method works well for random Gaussian noises but may not yield good result for salt and pepper noise.
OpenCV have algorithms termed as fastNlMeanDenoising with 4 variants: astNlMeansDenoising() - works with a single grayscale images, fastNlMeansDenoisingColored() - works with a color image, fastNlMeansDenoisingMulti() - works with image sequence such as videos (grayscale images), fastNlMeansDenoisingColoredMulti() - same as previous one but for color images. As per document, "Noise expected to be a Gaussian white noise." Gaussian white noise (GWN) is a stationary and ergodic random process with zero mean that is defined by fundamental property: "any two values of GWN are statistically independent no matter how close they are in time." Thus, these methods shall not work well on images containing texts such scanned copies of a textbook.Filter2D for removing speckles and isolated pixels: Blob is a group of connected pixels in an image that share some common property such as area, grayscale value, inertia, circularity...
kernel = np.ones((3,3), dtype=np.uint8)
kernel[1,1] = 0

# Create a sample (image) array that shows the 'blob' features
srcImg = np.array(
 [[1,0,1,1,1,0,0,0],
  [0,0,0,0,1,1,0,0],
  [1,0,1,1,1,1,1,1],
  [1,1,1,1,1,1,1,1],
  [0,0,1,1,1,0,1,1],
  [1,1,1,1,1,1,1,1],
  [1,1,1,0,1,1,0,1],
  [1,1,1,1,1,1,1,1]], dtype=np.uint8)

#input array needs to be converted to int8 or float32
srcImg = np.float32(srcImg)

mask = cv2.filter2D(srcImg, -1, kernel, borderType=cv2.BORDER_CONSTANT)
srcImg[np.logical_and(mask==8, srcImg==0)] = 1
cv2.imwrite('imgFiltered2D.png', srcImg*255)
| Input Image | Output Image |
 |  |
| 3 isolated pixels present | 3 isolated pixels removed |
cv2.filterSpeckles(bw_image_16bit, 'newVal' to paint-off the speckles, 'maxSpeckleSize' maximum number of pixels to be considered in a speckle, 'maxDiff' between neighbor disparity pixels to put them into the same blob) can be used to get similar output.
srcImg = cv2.filterSpeckles(srcImg, 1, 2, 100)[0]. img_blurred = cv2.blur(image, (5, 5)) where (5, 5) is the kernel size.This Python script uses Median Blur and Histogram Equalization to denoise a coloured image. Median Filters do not work well on texts as it filters out (or chip away) portions of characters. For median blur, kernel size should be an odd number else cv2 shall throw an error. Median filters work well on photographic images without text. Filters that are designed to work with gray-scale images shall not work with colour images. scikit-image provides the adapt_rgb decorator to apply filters on each channel of a coloured image.
Excerpt from scikit-image docs: "Removing small objects in grayscale images with a top hat filter: the top-hat transform is an operation that extracts small elements and details from given images. A white top-hat transform is defined as the difference between the input image and its (mathematical morphology) opening."
This is another code which uses Dilation, Blurring, Subtraction and Normalization to denoise an image and make the background white. This method applies well on scanned documents containing text and is compared with Adaptive Threshold option available in OpenCV. The adaptive threshold (such as OTSU thresholding) does not require a global threshold value and it can be further improved by splitting (tiling) the image into smaller rectangular segments for local background normalization (as explained in the page leptonica.org/binarization.html). OTSU method is an statistical method which minimizes in-class variance and maximizes between-the-class variance. Here, class refers to "set of pixels belong to a region". "Leptonica is a pedagogically-oriented open source library containing software that is broadly useful for image processing and image analysis applications."
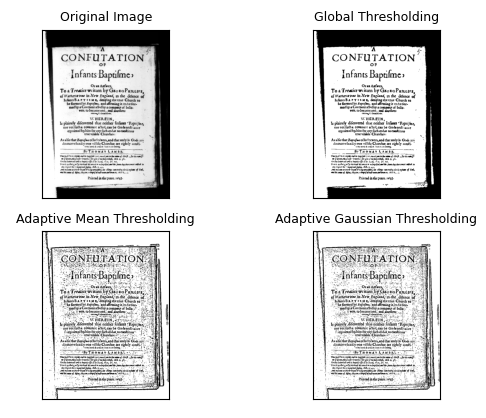
Image Thresholding: This is a process of converting pixel value above or below a threshold to an specified value. This operation can be used to segment an image. For example, a grayscale image can be converted to black-and-white by converting all pixels having intensity value ≤ 64 to 0. Image thresholding is used to change the background of scanned text into white. One can manually calculate the histogram of dominant pixel intensities using cv2.CalcHist() or numpy.histogram or pyplot.hist() from matplotlib which can be further used to define threshold colour intensity value.
The grayscale images contain 256 shades of gray! That means if you have to convert the image into binary black and white, any intensity between 0 and 255 are noise! The thresholding produces jagged (stair-stepped) edges as a rule than exception. This is a common issue with threshold when if text is 'thin', the gaps in the letters appear after threshold. On the other hand when fonts are 'thick', the letters start merging (merged characters and character erosion).The approach to use dilution followed by erosion fuses neighboring texts in the dilution step which cannot be separated in the subsequent erosion step. Increasing the resolution of input image by scaling up and applying dilution followed by erosion are sometimes helpful but not much as the image has to be scaled down again.
def imageThreshold(imgName, thresh_global, blur_kernel, adapt_kernel):
  img = cv2.imread(imgName, cv2.IMREAD_GRAYSCALE)
  assert img is not None, "File could not be read, check with os.path.exists()"
  img_blurred = cv2.medianBlur(img, blur_kernel)
  methods = [cv2.THRESH_BINARY, cv2.ADAPTIVE_THRESH_MEAN_C,
    cv2.ADAPTIVE_THRESH_GAUSSIAN_C]
  ret, thresh_binary = cv2.threshold(img, thresh_global, 255, methods[0])
  thresh_adapt_mean = cv2.adaptiveThreshold(img, 255, methods[1],
    methods[0], adapt_kernel, 2)
  thresh_adapt_gauss = cv2.adaptiveThreshold(img, 255, methods[2],
    methods[0], adapt_kernel, 2)

  titles = ['Original Image', 'Global Thresholding',
    'Adaptive Mean Thresholding', 'Adaptive Gaussian Thresholding']
  images = [img, thresh_binary, thresh_adapt_mean, thresh_adapt_gauss]
  cv2.imwrite('Gauss_Threshold.png', thresh_adapt_gauss)
  return titles, images
Excerpt from scikit-image: "If the image background is relatively uniform, then you can use a global threshold value. However, if there is large variation in the background intensity, adaptive thresholding (or local or dynamic thresholding) may produce better results. Note that local is much slower than global thresholding. Otsu's threshold method can be applied locally. For each pixel, an optimal threshold is determined by maximizing the variance between two classes of pixels of the local neighborhood defined by a structuring element."
def plot_multiple_images(titles, images, n_rows, img_array=True):
  n = len(images)
  n_cols = math.ceil(n / n_rows)
  for i in range(n):
    if img_array:
      image_i = images[i]
    else:
      image_i = cv2.imread(images[i])
    plt.subplot(n_rows, n_cols, i+1), plt.imshow(image_i, 'gray')
    plt.title(titles[i], fontsize=9)
    plt.xticks([]), plt.yticks([])
  plt.show()
titles, images = imageThreshold('Input.png', 127, 3, 7)
plot_multiple_images(titles, images, 2, True)
for rad in range(1, 4):
  kernel = cv2.getStructuringElement(MORPH_ELLIPSE, Size(2*rad+1, 2*rad+1))
  morph = cv2.morphologyEx(morph, cv2.MORPH_CLOSE, kernel)
  morph = cv2.morphologyEx(morph, cv2.MORPH_OPEN, kernel)
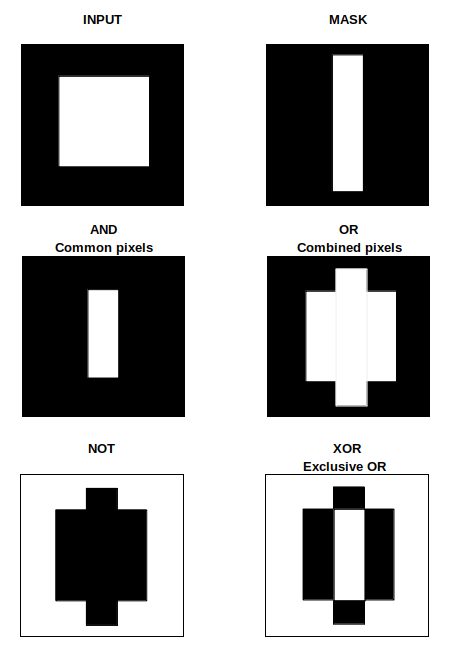
Image Masking
The mask operation works on an input image and a mask image with logical operator such as AND, NAND, OR, XOR and NOT. An XOR (eXclusive OR) operation is true if and only if one of the two pixels is greater than zero, but both pixels cannot be > 0. The bitwise NOT function flips pixel values that is pixels that are > 0 are set to 0, and all pixels that are equal to 0 are set to 255. RGB = [255 255 255] refers to 'white' colour and RGB = [0 0 0] denotes a perfectly 'black' colour.
- AND: A bitwise AND is true (= 1 or 255) if and only if both pixels are > 0. In other words: white + anycolor = anycolor, black + anycolor = black.
- OR: A bitwise OR is true (=1 or 255) if either of the two pixels is > 0. With bitwise_or: white + anycolour = white, black + anycolour = anycolour.
- XOR: A bitwise XOR is true (=1 or 255) if and only if one of the two pixels is > 0, but not both are zero.
- NOT: A bitwise NOT inverts the on (1 or 255) and off (0) pixels in an image.
The list comprehension statement in NumPy can be used to convert image pixels based on threshold directly: img = [0 if img_pixel > thresh_intensity else img_pixel for img_pixel in img]. This is an IF condition inside a FOR loop and it needs to be read backward to understand the logic behind this one liner.
[expression for item in list if conditional]
for item in list:
  if conditional:
    expression

[expr_1 if condition_1 else expr_2 for item in list]
for item in list:
  if condition_1:
    expr_1
  else:
    expr_2
Distance Masking: Determine the distance of each pixel to the nearest '0' pixel that is the black pixel. cv2.add(img1, img2) is equivalent to numPy res = img1 + img2. There is a difference between OpenCV addition and Numpy addition. OpenCV addition is a saturated operation while Numpy addition is a modulo operation. cv2.add(250, 25) = min(255, 275) = 255, np.add(250, 25) = mod(275, 255) = 20. Note there is no np.add function, used for demonstration purposes only.
| Input Image | Mask Image | Operation | Outcome of Operation |
| Binary or Grayscale | Binary | OR | Pixels having value 0 in mask set to 0 in output, other pixels from input image retained |
| Input Image | Mask Image | AND | Pixels having value 0 in mask set to 1 or 255 in output, other pixels from input image retained |
Circular Crop: This Python code uses OpenCV to create a circular crop of an image. The input image and cropped image are shown below. In HTML, border-radius property can be set to 50% to make the image cropped to a circle.

Alternatively, the image can be read into a NumPy array and pixels beyond each channel beyond the disk can be set to desired colour. This Python code uses OpenCV and NumPy array to create a circular crop of an image. The image is read using OpenCV, the BGR channels are extracted as NumPy arrays and then the pixels of each channel are set to white beyond the boundary of circular disk. Finally, BGR channels are merged to create the coloured image. Following image describes the formula required to add a round to the corners of an image
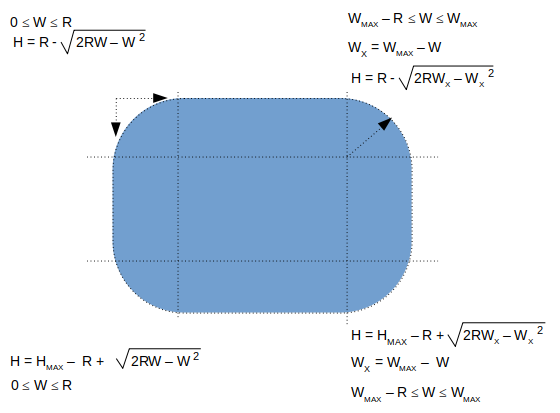
def createRoundedCorners(image, radius):
  img = cv2.imread(image)
  img_w, img_h = img.shape[1]-1, img.shape[0]-1
  for w in range(0, radius):
    ht = radius - int(np.sqrt(2*radius*w - w * w))
    for h in range(0, ht):
      img[h, w] = 255
      img[h, img_w - w] = 255
      img[img_h - h, w] = 255
      img[img_h - h, img_w - w] = 255
  return img
Unsharp Mask
Unsharp mark is a bit misnomer as it is used to sharpen an image. Unsharp mask is equivalent to blurred version of image where sharpened image = original image - blurred image. Unsharp mask locates pixels that differ from neighbouring pixels by the specified threshold (delta). It then increases the contrast of the pixels by the amount specified. For pixels within the specified radius, the lighter (or brighter) pixels get lighter (or brighter), the dark ones get darker.Excerpt from scikit-image docs: "Unsharp masking is a linear image processing technique which sharpens the image. The sharp details are identified as a difference between the original image and its blurred version. These details are then scaled, and added back to the original image: enhanced image = original + amount * (original - blurred). The blurring step could use any image filter method, e.g. median filter, but traditionally a Gaussian filter is used. The radius parameter in the unsharp masking filter refers to the sigma parameter of the Gaussian filter."
Connected Component Labeling
This Python script can be used to update an image background to white. This code uses Connected Component Labeling (CCL) method to remove the dark patches. The code customised for all images inside a folder can be found here. In case the text contains shadow in the background, the gray-scale image, the contrast has to be adjusted to accentuate the dark grays from the lighter grays - this can be achieved by imgGray = cv2.multiply(imgGray, 1.5) though the multiplier 1.5 used here needs to be worked out by trial-and-error. 1.1 is a recommended start value. Gaussian Blur and morphological operations such as erosion and dilation would be required to make the text sharper: kernel = np.ones((2, 1), np.uint8), img = cv2.erode(img, kernel, iterations=1). "Using Machine Learning to Denoise Images for Better OCR Accuracy" from pyimagesearch.com is a great article to exploit the power of ML to denoise images containing dominantly texts and noises. Before applying CCL, the image has to be converted into a binary format: threshImg = cv2.threshold(grayImg, 0, 255, cv2.THRESH_BINARY_INV | cv2.THRESH_OTSU)[1] can be used for this. cv2.THRESH_BINARY_INV applies threshold and inverts image colour to black background and white foreground.
nLables, labels, stats, centroids = cv2.connectedComponentsWithStats( imgBlackBackground, 8, cv2.CV_32S ) or outputCCWS = cv2.connectedComponentsWithStats(...) and (nLables, labels, stats, centroids) = outputCCWS, 8 is connectivity type (another option is 4), CV_32S is output image label type
- nLabels = total number of unique labels. The background is label 0, and the additional objects are numbered from 1 to nLabels-1.
- labels = list of masks created from connected components (CC) - spatial dimensions same as input image
- stats = statistical information of CC: cv2.CC_STAT_LEFT = stats[:, 0], cv2.CC_STAT_TOP = stats[:, 10], cv2.CC_STAT_WIDTH = stats[:, 2], cv2.CC_STAT_HEIGHT = stats[:, 3], cv2.CC_STAT_AREA = stats[:, 0] = stats[:, 4]
- Get maximum area of CC: max(stats[1:, -1]). Array of areas of connected components can be created using outputCCWS[2][:, 4].
- Get CC with 3 highest areas: sorted(stats[1:, -1], reverse=True)[:3]
- Get second highest area of CC: max( stats[1:, -1].remove(max(stats[1:, -1])) ) - note that this is a destructive approach and the items from list get deleted.
- Save ith CC label: cclMask = (labels == i).astype("uint8") * 255, cv2.imwrite( "ccComp_i.png", cv2.bitwise_or( cclMask)). Bitwise OR operation is needed to invert background colour to white - note that cv2.THRESH_BINARY_INV was used during threshold operation.
- Further dilation and/or erosion operation may need to be performed on each of the Connected Components to remove isolated pixels, tiny holes and irregular shapes.
contours_sorted = sorted(contours, key = cv2.contourArea, reverse = True)
for c in contours_sorted[1:-1]:
  x, y, w, h = cv2.boundingRect(c)
  input_img[y:y+h, x:x+w] = 255
cv2.imwrite('imgDespecled.png', input_img)
ImageMagick has options to use Connected Component Labelling technique to remove noises such as random pixels and despeckle an image. Excerpts from webpage: "Connected-component labelling (alternatively connected-component analysis, blob extraction, region labelling, blob discovery, or region extraction) uniquely labels connected components in an image. The labelling process scans the image, pixel-by-pixel from top-left to bottom-right, in order to identify connected pixel regions, i.e. regions of adjacent pixels which share the same set of intensity values."
Find background colour of an image: there is no unique and universal method to find the background colour of an image. One direct approach is to get the pixel value with the highest occurrence. This may not yield correct value if two pixels are nearly equal. Depending upon type of image, the method can be adjusted. For example, an image containing (lot of) texts only, the method to find pixel value of highest occurrence may give correct value of background color. Alternatively, in such images when there are no or sparse noises present, finding the pixel of maximum continuous occurrence in each row or column shall yield (universally) correct background colour.
Image Denoising using ML: Noise2Void is a widely used denoising algorithm, and is readily available from the n2v python package which isbased on TensorFlow. Refer: github.com/CAREamics/careamics - "CAREamics is a PyTorch library aimed at simplifying the use of Noise2Void and its many variants and cousins (CARE, Noise2Noise, N2V2, P(P)N2V, HDN, muSplit)." Articles describing the underlying principles are [1]"Noise2Noise: Learning Image Restoration without Clean Data" by Jaakko Lehtinen et al. [2]"Noise2Void - Learning Denoising from Single Noisy Images" by Alexander Krull et al. [3]"Noise2Self: Blind Denoising by Self-Supervision" by Joshua Batson and Loic Royer.
Pixel Multiplication
Also known as Graylevel scaling (and not same as geometrical scaling), this operation can be used to brighten (scaling factor > 1) or darken (scaling factor < 1) an image. If the calculate value of pixel after multiplication is > maximum allowed value, it is either truncated to the maximum value or wrapped-around the minimum allowed pixel value. For example, a pixel value of '200' when scaled by a factor 1.3, the new value of 260 shall get truncated to 255 or wrapped to 5 (= 260 - 255).There is similar operation "Image Segmentation with Distance Transform and Watershed Algorithm" available at docs.opencv.org/3.4/d2/dbd/tutorial_distance_transform.html. Here, OpenCV function distanceTranform is used to obtain derived representation of a binary image, where the value of each pixel is replaced by its distance to the nearest background pixel.
Adapted from stackoverflow.com/../what-processing-steps-should-i-use-to-clean-photos-of-line-drawings, the Python + OpenCV code attached here can be used to clean image as shown below.
Morphological Operations
Morphology refers to "the study of the forms / shape / structure of things". In linguistics, it is study about pattern of word formation (inflection, derivation, and compounding). Image processing methods that transform images based on shapes are called Morphological Transformations. Erosion is the morphological operation that is performed to reduce the size of the foreground object. Dilaton is opposite of erosion. Thus, thickness of fonts can be reduced using erosion and vice versa. Bright regions in an image tend to “get brighter” after Dilation, which usually results in an enhanced image. Removing noise from images is one of the application of morphological transformations. Morphological operators require Binary Images which are images whose pixels have only two possible intensity values. They are normally displayed as black and white and the two values are 0 for black, and either 1 or 255 for white.
Erosion is also known as minimum filter which replaces or removes objects smaller than the structure (thinning operation - removes foreground pixels). Similarly, dilation is called maximum filter (thickening operation - adds foreground pixels). A structuring element or kernel is a simple shape used to modify an image according to the shape locally fits or misses the image. A structuring element is positioned all possible locations in the image and thus sometime may not fit on boundary pixels. Note that morphological operations such as Erosion and Dilation are based on set operations whereas convolutions are based on arithmetic operations.
Tutorial at docs.opencv.org titled "Extract horizontal and vertical lines by using morphological operations" demonstrates how horizontal lines can be removed as shown below.
Excerpt from docs.opencv.org: "During erosion a pixel in the original image (either 1 or 0) will be considered 1 only if all the pixels under the kernel is 1, otherwise it is eroded (made to zero)." Excerpt from pyimagesearch.com: "A foreground pixel in the input image will be kept only if all pixels inside the structuring element are > 0. Otherwise, the pixels are set to 0 (i.e. background)." From OpenCV tutorial: "The kernel B has a defined anchor point, usually being the center of the kernel. As the kernel B is scanned over the image, we compute the maximal pixel value overlapped by B and replace the image pixel in the anchor point position with that maximal value. As you can deduce, this maximizing operation causes bright regions within an image to "grow" (therefore the name dilation)."
As you may have realized, none of the 3 definitions quoted above is clear where the use of 0 and 1 for boolean and pixel intensities are mixed-up. Let's see the effect of kernel and erosion with following examples.
| erosion = cv2.erode(img, np.ones((3, 3), np.uint8), iterations = 1) | ||
| Image with black background | Image after erosion | Image after Dilation |
 |  |  |
| Image with white background | Image after erosion | Image after Dilation |
 |  |  |
| As evident now, erosion adds black pixels and depending upon the background colour, the thickening (white background) or thinning (black background) effect can be observed. | ||
A key consideration while using morphological operations is the background colour of the image. Should it be white or black? Is the kernel definition dependent on whether background of image is white or black? docs.opencv.org recommends: "(Always try to keep foreground in white)". If you have an image with white background, in order to comply this recommendation, use whiteForeground = cv2.bitwise_not( blackForeground ) before erosion and then blackForeground = cv2.bitwise_not( whiteForeground ) after erosion. This short piece of code describes these steps.
A = Image, B = Kernel --- Erosion = A ⊖ B, Dilation: A ⊕ B, Opening: A o B = (A ⊖ B) ⊕ B, Closing: A ⊚ B = (A ⊕ B) ⊖ B. A combination of morphological operations can be used for smoothing and dirt removal. For example: convert image background to black -> dilate to remove white dots (lonely pixels in original image) -> erode to bring text to original thickness -> invert background colour of image back to white. The operations can be chain-combined as: k_blur = ((3, 3), 1), k_erode = (5, 5), k_dilate = (3, 3). cv2.imwrite( 'imgMorphed.png', cv2.dilate( cv2.erode( cv2.GaussianBlur( cv2.imread('Input.png', 0) / 255, k_blur[0], k_blur[1]), np.ones(k_erode)), np.ones(k_dilate) ) * 255 ).
cv2.getStructuringElement(cv2.MORPH_RECT, (50,1)): this can be used to create a horizontal line to remove such lines from an image. cv2.MORPH_RECT, (1, 50) can be used to create a vertical line.
Rectangular Kernel: cv2.getStructuringElement(cv2.MORPH_RECT,(3,3))
array([[1, 1, 1],
       [1, 1, 1],
       [1, 1, 1]], dtype=uint8)

Elliptical Kernel: cv2.getStructuringElement(cv2.MORPH_ELLIPSE,(5,5))
array([[0, 0, 1, 0, 0],
       [1, 1, 1, 1, 1],
       [1, 1, 1, 1, 1],
       [1, 1, 1, 1, 1],
       [0, 0, 1, 0, 0]], dtype=uint8)

Cross-shaped Kernel: cv2.getStructuringElement(cv2.MORPH_CROSS,(3,3))
array([[0, 1, 0],
       [1, 1, 1],
       [0, 1, 0], dtype=uint8)
Main Function
import cv2, sys
import numpy as np
def imgMorphOperation(imgName, kernel_size, imgType='File', morph='Opening'):
  #imgType = 'File'  or NumPy 'Array' if already loaded by cv2.imread
  #morph = 'Opening', 'Closing', 'Dilation', 'Erosion'
  if imgType == 'File':
    img = cv2.imread(imgName, cv2.IMREAD_GRAYSCALE)
  else:
    img = imgName
  # Otsu's thresholding
  ret,img = cv2.threshold(img, 0, 255, cv2.THRESH_BINARY+cv2.THRESH_OTSU)

  kernel = np.ones((kernel_size, kernel_size), np.uint8)
  if morph == 'Opening':
    imgMorphed = cv2.morphologyEx(img, cv2.MORPH_OPEN, kernel)
  elif morph == 'Erosion':
    imgMorphed = cv2.erode(img, kernel, iterations = 1)
  elif morph == 'Dilation':
    imgMorphed = cv2.dilate(img, kernel, iterations = 1)
  elif morph == 'Closing':
    imgMorphed = cv2.morphologyEx(img, cv2.MORPH_CLOSE, kernel)
  else:
    print("\nMorphological operation not defined! Exiting. \n")
    sys.exit()

  return imgMorphed
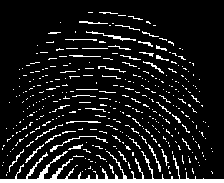
Original Image: Reference: "Morphological Image Processing" by Preechaya Srisombut, Graduate School of Information Sciences and Engineering,Tokyo Institute of Technology
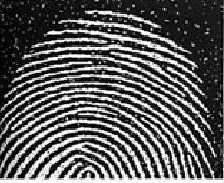
imgName = 'fingerPrintWithNoise.png'
imgEroded = imgMorphOperation(imgName, 3, imgType='File', morph='Erosion')
cv2.imwrite('fingerPrintEroded.png', imgEroded)
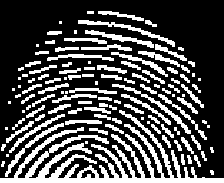
Image after First Erosion
imgDilated1 = imgMorphOperation(imgEroded, 3, imgType='Array', morph='Dilation')
cv2.imwrite('fingerPrintDilate1.png', imgDilated1)
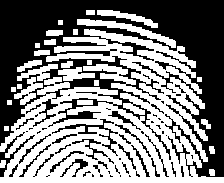
Image after First Dilation
imgDilated2 = imgMorphOperation(imgDilated1, 3, imgType='Array', morph='Dilation')
cv2.imwrite('fingerPrintDilate2.png', imgDilated2)
Image after Second Dilation
imgFinal = imgMorphOperation(imgDilated2, 3, imgType='Array', morph='Erosion')
cv2.imwrite('fingerPrintDenoised.png', imgFinal)
Denoised Image after Second Erosion
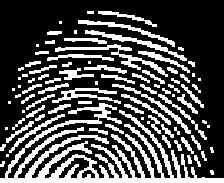
Image deskewing
First thing first: to deskew an image, remove the noise especially around the boundary or edges of the image else the contour of largest area shall be the one formed by continuous dark patches at the edges (almost the size of the image itself). This is the method of straightening a rotated image - a mandatory step in image pre-processing before feeding the cleaned-up image to an Optical Character Recognition (OCR) tool. The recommended steps are described below:- Convert the image to gray scale
- Apply slight blurring to decrease intensity of noise in the image
- Invert and maximize the colors of image by thresholding to make text block detection easier, thus making the text white and changing background to black
- Merge all printed characters of the block via dilation (expansion of white pixels) to find text blocks
- Use larger kernel on X axis to get rid of all spaces between words and a smaller kernel on Y axis to blend in lines of one block between each other, but keep larger spaces between text blocks intact
- Find areas of the text blocks of the image
- Use simple contour detection with minimum area rectangle for all the block of text
- Determine skew angle: angle the texts need to be rotated to make them aligned to page: there are various approaches to determine skew angle, such as average angle of all text blocks, angle of the middle block or average angle of the largest, smallest and middle blocks. Simple one using the largest text block works fine in most of the cases.
import cv2
import numpy as np
def cleanTextImage(img, min_area: int):
  '''
  Ref: stackoverflow.com/ ... /clean-text-images-with-opencv-for-ocr-reading
  This code requires (assumes) properly binarized white-on-black image (e.g.
  after grayscale conversion, black hat morphing and Otsu's thesholding).
  '''
  num_comps, labeled_pix, comp_stats, comp_centroids = \
    cv2.connectedComponentsWithStats(img, connectivity=4)

  # Get indices/labels of the remaining components based on the area stat
  # (skip the background component at index 0)
  comp_labels = [i for i in range(1,num_comps) if comp_stats[i][4] >= min_area]

  # Filter the labeled pixels based on the remaining labels,
  # assign pixel intensity to 255 (uint8) for the remaining pixels
  cln_img = np.where(np.isin(labeled_pix,comp_labels)==True,255,0).astype('uint8')

  return cln_img
Usage:
_,img = cv2.threshold(cv2.imread('In.jpg',0), 0,255,cv2.THRESH_BINARY+cv2.THRESH_OTSU)
cv2.imwrite('cln_img.jpg', cleanTextImage(img, 10))Template Matching
Similar to erosion and other morphological operations, there is another utility named Template Matching where an image template slides (similar to kernel or structuring elements - moving the patch one pixel at a time: left to right, up to down) and compares the template and overlapping patch of input image. At each location, a metric is calculated so it represents how "good" or "bad" the match at that location is (or how similar the patch is to that particular area of the source image). It returns a grayscale image, where each pixel denotes how much does the neighbourhood of that pixel match with template. The brighter pixels representing good match will have a value closer to 1, whereas a relatively darker pixel representing not so good match will have a value close to 0. If input image has the size (W x H) and template image is of size (w x h), output image will have a size of (W-w+1, H-h+1).The value of match and location of match from the metric calculated by cv2.matchTemplate() can be retried by min_val, max_val, min_loc, max_loc = cv2.minMaxLoc(result) to get the minimum and maximum value of 'match' as well the coordinates indicating the "top-left, bottom-right" corners for the bounding box. min_loc and max_loc are touples of (x, y).
import cv2 as cv
import numpy as np

img_rgb  = cv.imread('NoisyImage.png')
img_gray = cv.cvtColor(img_rgb, cv.COLOR_BGR2GRAY)

imgTemplate = np.array([[1, 1, 1, 1], [1, 0, 0, 1],
                        [1, 0, 0, 1], [1, 1, 1, 1]], np.uint8) * 255
w, h = imgTemplate.shape[::-1]
res = cv.matchTemplate(img_gray, imgTemplate, cv.TM_CCOEFF_NORMED)

# If multiple occurrences of match found, cv.minMaxLoc() won't give all
# the locations. In that case, thresholding needs to be used.
threshold = 0.8
loc = np.where(res >= threshold)
for pt in zip(*loc[::-1]):s
  #Add rectangle with red lines around matched patches
  #cv.rectangle(img_rgb, pt, (pt[0] + w, pt[1] + h), (0,0,255), 1)

  # Change pixels in the matched patches to white (255)
  img_gray[pt[1]:pt[1] + h, pt[0]:pt[0] + w] = 255
cv.imwrite('imageMatched.png', img_gray)
If np.uint8 is ignored in imgTemplate array definition, following error occurs in statement: res = cv.matchTemplate(img_gray, imgTemplate, cv.TM_CCOEFF). "cv2.error: OpenCV(4.7.0) /io/ opencv/ modules/ imgproc/ src/ templmatch.cpp: 1164: error: (-215: Assertion failed) (depth == CV_8U || depth == CV_32F) && type == _templ.type() && _img.dims() <= 2 in function 'matchTemplate'"
Find Contours
From docs.opencv.org/ ... /tutorial_py_contours_begin.html: Contours are curves joining all the continuous points (along the boundary), having same color or intensity. The contours are a useful tool for shape analysis and object detection and recognition. In OpenCV, finding contours is like finding white object from black background. So object to be found should be white and background should be black.
cv2.findContours() function is used to detect objects in an image. Usage: imgCont, contours, hierarchy = cv.findContours(threshold, cv.RETR_TREE, cv.CHAIN_APPROX_SIMPLE) where imgCont is modified image returned from findContour operation, contours is a Python list of all the contours in the image (each contour as a Numpy array of (x,y) coordinates of boundary points of the object). It accepts argument to specify Contour Retrieval Mode and Contour Approximation Method. This is especially useful to identify nested contours (object inside another object).cv2.RETR_LIST: It simply retrieves all the contours, but doesn't create any parent-child relationship thus they all belongs to same hierarchy level. cv2.RETR_TREE: It retrieves all the contours and creates a full family hierarchy list. cv2.RETR_CCOMP: This flag retrieves all the contours and arranges them to a 2-level hierarchy. Thus, external contours of the object (i.e. its boundary) are placed in hierarchy-1 and the contours of holes inside object (if present) is placed in hierarchy-2. cv2.RETR_EXTERNAL: If you use this flag, it returns only extreme outer flags. All child contours are left behind.
cv2.CHAIN_APPROX_SIMPLE removes all redundant points and compresses the contour for example for straight lines only end points are needed. cv2.CHAIN_APPROX_NONE stores all boundary points.
Draw Contours
cv.drawContours(img, contours, -1, (255, 255, 0), 2): cv2.drawContours function is used to draw any shape for which the boundary points are known. Its first argument is source image, second argument is the contours which should be passed as a Python list, third argument is index of contours (useful when drawing individual contour, -1 can be used to draw all contours), next argument is color and the last argument is thickness of boundary lines.Following function can be used to remove all horizontal lines from an image. Vertical lines can be removed by changing (kernel_size, 1) to (1, kernel_size).
def imgRemoveHorizLines(imgName, imgType='File', kernel_size=50):
  if imgType == 'File':
    image = cv2.imread(imgName)
  else:
    image = imgName
  imGray = cv2.cvtColor(image, cv2.COLOR_BGR2GRAY)
  thresh = cv2.threshold(imGray, 0,255, cv2.THRESH_BINARY_INV + cv2.THRESH_OTSU)[1]

  hr_krnl = cv2.getStructuringElement(cv2.MORPH_RECT, (kernel_size, 1))
  rm_hr = cv2.morphologyEx(thresh, cv2.MORPH_OPEN, hr_krnl, iterations=2)
  cnts = cv2.findContours(rm_hr, cv2.RETR_EXTERNAL, cv2.CHAIN_APPROX_SIMPLE)
  if len(cnts) == 2:
    cnts = cnts[0]
  else:
    cnts = cnts[1]

  for c in cnts:
    cv2.drawContours(image, [c], -1, (255,255,255), 3)
  cv2.imwrite('imgHorizLinesRemoved.png', image)
  return image
RUN LENGTH SMOOTHING ALGORITHM (RLSA): block segmentation and text discrimination method used in Document Image Processing to extract the region of interest (ROI) such as block-of-text, title, and content. This method can be used to remove text in images where content from next / previous page gets added while scanning pages from the books.
Animations using Python
Convert PNG to Animated GIF: Click here to get a Python script to convert a set of PNG file to animated GIF.
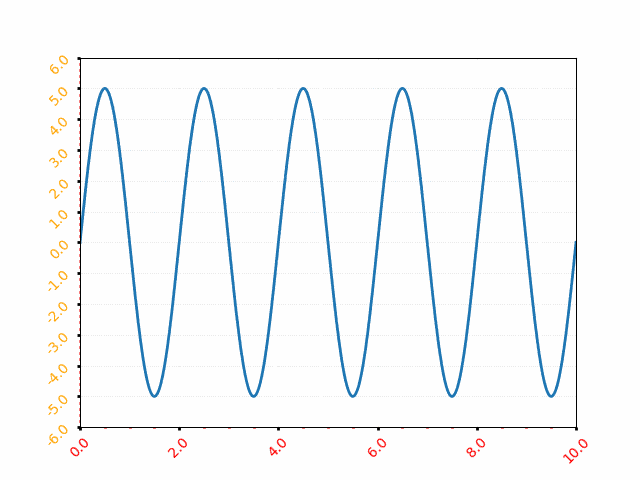
There are few requirements to be kept in mind while using VideoWriter in OpenCV else video writing fails silently - no valid video file is written: [1] All frames should of same size including number of channels [2] All images should be either coloured or black-and-white [3] If input images are monochrome (black and white or grayscale) type, it should be indicated with argument isColor = False or '0' such as cv2.VideoWriter('output.avi', fourcc, 25, size, 0) [4] The images must be in BGR format (and not RGB) or it will not write any video [5] FFmpeg should be configured properly [6] Try different codecs and see which one works or use "-1" in place of the codec flag and select one from the list [7] frameSize required by cv2.VideoWriter is (width, height) and not (height, width) which is the shape of image array resulting from cv2.imread or Image.open [8] Specify frames per second or FPS argument as type float [9] If folder or path does not exist, VideoWriter will fail silently.Animation of a sine wave. The Python code can be found here.
def rotateImageInCircle(images, icon_w, icon_h, radius):
  num_images = len(images)
  frame_w = ((icon_w + 2 * radius) // 2) * 2
  frame_h = ((icon_h + 2 * radius) // 2) * 2
  xc = frame_w // 2
  yc = frame_h // 2
  img_frames = []
  for theta in range(360):
    frame = np.ones((frame_h, frame_w, 3), dtype=np.uint8)*255
    for i, image in enumerate(images):
      img = cv2.resize(cv2.imread(image), (icon_h, icon_w))

      angle = (i/num_images + theta/360) * 2 * np.pi
      x = int(xc + radius * np.cos(angle))
      y = int(yc + radius * np.sin(angle))
      img_x = x - icon_w // 2
      img_y = y - icon_h // 2
      img_x = max(0, min(img_x, frame_w - icon_w))
      img_y = max(0, min(img_y, frame_h - icon_h))

      frame[img_y:img_y + icon_h, img_x:img_x + icon_w] = img
    img_frames.append(frame)
return frame_w, frame_h, img_framesImage to PDF
This Python code converts all the images stored in a folder into a PDF file.
Coordinate Transformation Matrices
If {X} is a row vector representing a 2D or 3D coordinates of a point or pixel, {X'} = [T] {X} where [T] is the transformation matrix. Thus: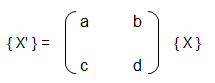
| Operation | a | b | c | d | Remark |
| Scaling | ≠ 0, ≠ 1 | 0 | 0 | ≠ 0, ≠ 1 | |
| Reflection about y-axis | -1 | 0 | 0 | 1 | |
| Reflection about x-axis | 1 | 0 | 0 | -1 | |
| Reflection about origin | < 0 | 0 | 0 | < 0 | |
| Shear | 0 | ≠ 0, ≠ 1 | ≠ 0, ≠ 1 | 0 | |
| Rotation: 90°CCW about origin | 0 | 1 | -1 | 0 | |
| Rotation: 180°CCW about origin | -1 | 0 | 0 | -1 | |
| Rotation: 270°CCW about origin | 0 | -1 | -1 | 0 | |
| Rotation: θ CCW about origin | cosθ | sinθ | -sinθ | cosθ | |
| Reflection about x-axis | -1 | 0 | 0 | 1 | |
| Reflection about x-axis | 1 | 0 | 0 | -1 | |
| Reflection about y = x | 0 | 1 | 1 | 0 | |
| Reflection about y = -x | 0 | -1 | -1 | 0 |
Rotation is assumed to be positive in right hand sense or the clockwise as one looks outward from the origin in the direction along the rotation axis. The right hand rule of rotation is also expressed as: align the thumb of the right hand with the positive direction of the rotation axis. The natural curl of the fingers gives the positive rotation direction. Note the the x-coordinate of the position vector will not change if rotation takes place about x-axis, y-coordinate of the position vector will not change if rotation takes place about y-axis and so on.
Scaling: if a = d and b = c = 0, uniform scaling occurs. A non-uniform expansion or compression will result if a = d > 1 or a = d < 1 respectively. Scaling looks like an apparent translation because the position vectors (line connecting the points with origin) are scaled and not the points. However, if the centroid of the image or geometry is at the origin, a pure scaling without apparent translation can be obtained.
Homogeneous coordinates: in the transformation matrices described in the table above, the origin of the coordinate system is invariant with respect to all of the transformation operations. The concept of homogenous coordinate system is used to obtain transformations about an arbitrary point. The homogenous coordinates of a non-homogeneous position vector {X Y} are {X' Y' h} where X = X'/h and Y = Y'/h and h is any real number. Usually, h = 1 is used for convenience though there is no unique representation of a homogenous coordinate system. Thus, point (3, 5) can be represented as {6 10 2} or {9 15 3} or {30 50 10}. Thus, a general transformation matrix looks like shown below. Note that every point in a two-dimensional plane including origin can be transformation (rotated, reflected, scaled...).

[T] = [T'] [R] [R'] [R]-1 [T']-1
Thus, the steps are:- Translate the line and the object both so that the line passes through the origin: the matrix [T'] in above concatenated matrix [T]
- Rotate the line and the object about the origin so that the line coincides with one of the coordiante axis: the matrix [R]
- Reflect the object about the line - the coordinate axis it coincides with: the matrix [R']
- Apply the inverse rotation above the origin using: the matrix [R]-1
- Apply the inverse translation to the original location: the matrix [T]-1
3D Transformations
The three-dimensional representation and display of an object is necessary for the understanding of the shape of the object. Additionally, the ability to translate (pan), rotate (dolly), scale (zoom), reflect and project help understand the shape of the object. Analogous to homogeneous coordinate system in 2D, a point in 3D space {X Y Z} can be represented by a 4D position vector {X' Y' Z' h} = {X Y Z 1} [T] where [T] is the transformation matrix similar to the one used in 2D case. A generalized 4 × 4 transformation matrix for 3D homogeneous coordinates is: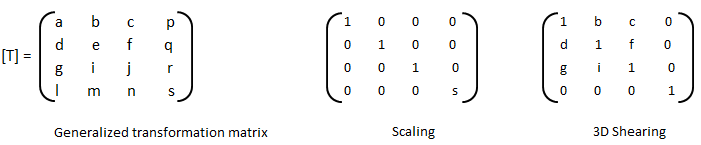


- Alpha Mask / Wipe Transition: Uses a grayscale mask image to gradually wipe / transition between 2 images. Alpha = Transparency
- Bars: Add colored bars around your video
- Blur/Sharpen: Adjust the blur/sharpness of the frame’s image - ffmpeg -i in.mp4 -vf "unsharp= luma_msize_x=7: luma_msize_y=7: luma_amount=2.5: enable= 'between(t, 2, 3)'" -y out.mp4
- Adjust the brightness and contrast of the frame’s image: A value of -1 for brightness makes the image black and value of +1 makes it white. Intermediate values can be used to adjust brightness. The value of contrast varies between -128 to +128 in OpenShot and controls sharpness or intensity or depth of the colour.
- Caption: Add text captions on top of your video - background alpha, padding, corner radius, font alpha, font size, text location... are some of the options available in OpenShot
- Chroma Key (Greenscreen): Replaces the color (or chroma) of the frame with transparency (i.e. keys out the color). This can be used to remove background colours in screen recording with web-cam such as OBS Studio. However, the background colour should be of any single uniform colour and not the green colour only.
- Color Saturation: Adjust the color saturation, 0 means black-and-white image and higher value increase the intensity of the colours
- Color Shift: Shift the colors of an image up, down, left, and right (with infinite wrapping)
- Crop: Crop out any part of your video
- Deinterlace: Remove interlacing from a video (i.e. even or odd horizontal lines)
- Hue: Adjust the hue / color of the frame’s image - this is used to create Colour Change Effect
- Negative: Negates the colors, producing a negative of the image - OpenShot does not provide any control on the attributes of the negative colors of the image
- Object Detector: Detect objects through the video
- Pixelate: Pixelate (increase or decrease) the size of visible pixels that is the effect reduces PPI of the image and hence it blurs the image
- Shift the image up, down, left, and right (with infinite wrapping) - this option separates and shows the 3 colour channels by horizontal and/or vertical shift specified - also known as Glitch Effect sometimes
- Stabilizer: Stabilize video clip to remove undesired shaking and jitter
- Wave: Distort the frame’s image into a wave pattern
Similarly, transition as the name suggests, indicates the method or style to switch between one clip (or frame) to another, such as to gradually fade (or wipe) between two clips. Thus, the most common location of a 'transition' is either at the start or end of the clip or image or keyframe. Direction of transitions adjust the alpha or transparency of the clip below it, and can either fade from opaque (dark) to transparent (default), or transparent to opaque. One interesting animation shown below is 'Cube' transition in PowerPoint and LibreOffice Impress which ensures continuity of information.
Following Python code generate frames to create Cube transition.
def frames_cube_transition(img1, img2, img_w, img_h, steps=50):
  transition_frames = []
  for i in range(steps):
    alpha = i / steps
    angle = alpha * np.pi/2
    m1 = np.float32([[1, 0, -img_w*   np.sin(angle)],  [0, 1, 0]])
    m2 = np.float32([[1, 0,  img_w*(1-np.sin(angle))], [0, 1, 0]])
    frame1 = cv2.warpAffine(img1, m1, (img_w, img_h))
    frame2 = cv2.warpAffine(img2, m2, (img_w, img_h))

    combined_frame = np.maximum(frame1, frame2)
    transition_frames.append(combined_frame)
  return transition_frames
Most of the open source program are better at dealing with images. However, the flexibility to deal with text are less and sometimes limited options are there. For example, to add scrolling credits a long text object is moved vertically to make it appear to be scrolling: appearing from the bottom and disappearing through the top. Blender version 3.6.1 does not have this as standard feature. An indirect way to do this is to create the image of the text and animate it bottom to top.
Animation: the visual appearance of a video and animations are same and hence a video is an animation and an animation is a video - to human eyes. Thus, the option to animate in a Video Editing program may be confusing initially. The feature 'animation' refers to ability to change few keyframes in the clip or the video such as zoom, pan or slide.
Example demonstration: Create a Zoom and Pan animation in OpenShot
- Step-1: Move the timeline where you want to begin to zoom
- Step-2: Right click on your clip, and choose Transform: this will display some interactive handles over the video preview
- Step-3: Drag the corner (while holding CTRL) to scale the image larger or smaller
- Step-4: Alternatively, use the Clip's properties to change the scale_x and scale_y, and location_x, and location_y properties
- Step-5: Drag the center circle handle to move the image
- Step-6: Move to the next position in the video, and repeat these steps.
Note that most of the 'rotation' codes are meant to rotate an images about z-axis which the axis perpendicular to the plane of computer screen. Rotation about x- and y-axis which are coplanar to computer screens requires homographic transformation which is a projective transformation between two planes. One example is available at answers.opencv.org/ ... /direct-formula-for-3d-rotation-done-by-warpperspective-or-remap. Note that this code is written in old opencv format and not compatible with latest cv2 and Python.
Audio and Video Codecs
The audio data is stored as matrix with rows corresponding to audio frames and columns corresponding to channels. There are other utilities in OCTAVE such as create and use audioplayer objects, play an audio, write audio data from the matrix y to filename at sampling rate fs, create and use audiorecorder objects, scale the audio data and play it at specified sample rate to the default audio device (imagesc vs. audiosc)....
Audio Codec: The processing of audio data to encode and decode it is handled by an audio codec . Bit rate - The higher the bit rate, the higher the quality can be. Some audio codecs are: Advanced Audio Coding (AMC), MP3, Pulse Code Modulation (PCM) of Voice Frequencies (G.711)... Some terms associated with Audio data format and structure are: Sample Size, Channel, Channel Count, Audio Forms, Waveforms, Stereo (2 audio channels)
Video Encoding: In early days of digital video, video files were a collection of still photos. For a video recorded at 30 frames per second, 30 photos per second of footage has to be created and stored. Video encoding is the process of converting video files to a digital files so that they are not saved as collection of individual images but as fluid images. Some of the most popular encoding formats include: MP4, MOV, AVI, QuickTime. Standard definition (SD video) - any recording or video below 720p is considered standard definition. For common resolutions of 720 and 1080, the naming convention is based on the total number of pixels running in a vertical line down the display area. For 2K, 4K or 8K video, the resolution is named for the number of pixels running in a horizontal line across the frame. FHD = 1080P (Full High Definition where 'P' stands for progressive scan and not for Pixels). QHD (Quad High Definition) is 2560x1440 pixels and 2K resolution is 2048 x 1080 pixels. UHD or 4K - Ultra High Definition resolution is technically 3840x2160 pixels.
Remuxing and Transcoding: Remuxing is process of changing the video container only, a lossless process where original audio and video data is kept unaltered. The opposite to remuxing is transcoding, which is about conversion of one encoding method to another. Transcoding changes the source data and hence can be a lossy process.
Frame rate (frames per second or fps - note that the term 'rate' refers to per unit time in most of the cases) is rate at which images are updated on the screen. For videos, sample rate is number of images per second and for audios, sample rate is number of audio waves per second. Number of frames in a video = fps × duration of the video. Note that some video formats do not store the frames as one frame after other and instead use delta frames where only the changes from one frame to next are stored. In these cases, Number of frames in a video = fps × duration of the video shall not hold true. The programs that are used for video file compression and playback are called codecs. Codec stands for coder and decoder. As in 2022, the best video codec is H.264. Other codecs available are MPEG-2, HEVC, VP9, Quicktime, and WMV.
| Video Format | Creator / Owner | Usage Recommendations |
| AVI | Microsoft | For playing video on Windows devices, large file size |
| AVCHD | --- | High quality but requires good hardware for playback |
| FLV & F4V | Adobe | Flash video formats, once popular now obsolete |
| MP4 (H.264) | Open-source | Wide compatibility and balance of file size and quality |
| MKV | Open-source | Stores wide range of video, audio, and subtitle tracks in one file |
| M4V | Apple | Similar to MP4 but protected by Apple’s FairPlay DRM copyright |
| MOV | Apple | Storing high-quality video files, and professional video editing |
| MPEG-2 | Open-source | Used for DVDs and sometimes for TV broadcasts |
| ProRes | Apple | High-definition video editing in Final Cut Pro |
| DNxHR, DNxHD | Avid Technology | high-quality video editing in Avid Media Composer |
| 3GP, 3G2 | Open-source | Offers small file sizes suitable for mobile viewing |
| OGV | Open-source | Ogg Video: used for web applications supported by HTML5 |
| WebM | Open-source | Designed for the web, good compression and video quality supported by HTML5 |
| WMV | Microsoft | Windows Media Video, optimized for Windows Media Player |
Image Editing using ImageMagick
ImageMagick is nearly an universal tool to open any format of image and convert into another format. In MS Windows, once you have added ImageMagick installation folder location into 'Path' variable, use magick.exe mogrify -format jpg *.heic to convert all images in HEIC format to JPG format. -quality 75 can be added to specify the quality level of output image. The value 75 specified here can be anywhere between 1 to 100 where 1 refers to the most compression and worst quality. To scale all PNG images in current folder: magick.exe mogrify -resize 540x360 *.png. The option -resize 540x keeps the height in proportion to original image and -resize x360 keeps the width in proportion to original image. Option -resize 540x360 is equivalent to min(540x,x360). To resize all images in current directory to 480 width (and height reduced proportionally): mogrify -resize 480x *.jpg and to resize to a height of 270px: convert input.jpg -geometry x270 output.jpg and to scale down images to 360 pixels: mogrify *.jpg -resize 360x360^ImageMagick provides two similar tools for editing and enhancing images: convert - basic image editor which works on one image at a time and mogrify - mostly used for batch image manipulation which by default overwrite the input images. Note that the output of both these two tools are not always the same. If you are using Windows OS, there is in-built 'convert' function. Hence, to use 'convert' utility, one need to use the command "C:\Program Files\ImageMagick-7.0.10-Q8\magick" convert input.png -crop 100x100 + 800+450 cropped.png. To crop from all sides, use -crop option twice with first pair denoting left-top values and the second pair specifies right-bottom crop magnitudes: "mogrify -crop +100+50 -crop -75-25 ./img_folder/*.png" where crop values are 100 from left, 50 from top, 75 from right and 25 from bottom. For single image: convert input.png -crop +100+50 -crop -75-25 cropped.png. To change format of images in a folder: convert *.TIF -set filename: "%t" %[filename:].jpg. To scale all image and store scaled images in a folder (no overwriting of the existing files): mogrify -resize 600x -path ./Scaled *.jpg - note that the specified folder (./Scaled here) must exist before running this statement.
Scale all images in a folder to specified dimension maintaining aspect ratio of original images
def resizePadImages(image, target_w, target_h, pad_color=(255, 255, 255)):
  '''
  Scale the image while maintaining the aspect ratio - fill extra space
  in width and/or height direction with specified pad_color which has
  default value of white that is RGB = (255, 255, 255).
  '''
  ht, wd = image.shape[:2]
  size = (target_h, target_w)

  scale_factor = min(target_w / wd, target_h / ht)
  new_w, new_h = int(wd * scale_factor), int(ht * scale_factor)
  resized_img = cv2.resize(image, (new_w, new_h), interpolation=cv2.INTER_AREA)

  # Create a new image with the target size and fill it with the pad color
  scaled_image = np.full((target_h, target_w, 3), pad_color, dtype=np.uint8)

  # Center the resized image on the padded image
  dx = (target_w - new_w) // 2
  dy = (target_h - new_h) // 2
  scaled_image[dy:dy+new_h, dx:dx+new_w] = resized_img

  return scaled_image
def scaleImagesFolder(input_folder, target_w, target_h, colr):
output_folder = os.path.join(input_folder, "scaled_images")
if not os.path.exists(output_folder):
os.makedirs(output_folder)
for file_name in os.listdir(input_folder):
if file_name.lower().endswith(('.png', '.jpg', '.jpeg')):
image_path = os.path.join(input_folder, file_name)
image = cv2.imread(image_path)
if image is not None:
scaled_padded_image = resizePadImages(image, target_w, target_h, colr)
output_path = os.path.join(output_folder, file_name)
cv2.imwrite(output_path, scaled_padded_image)
scaleImagesFolder('Img', 640, 360, (255, 255, 255))
Image, Audio and Video Editing using OpenCV
Noise in Audio: noise generated by electrical sparks and burning sparklers is collectively known as a crackle or crackling. Sound generated by burning sparklers are described as sizzling or popping. Sound generated by High-Voltage Lines are referred to as buzzing or hissing. A chatter sound refers to either continuous, low-pitched conversational background noise (like a crowd or cafe) or a rapid clicking noise (such as teeth chattering from cold).
Convert images (PNG, JPG) to video (mp4, avi) - click on the link for Python script. Many a time the image files are named as img-1.png, img-2.png...img-9.png, img-10.png, img-11.png...img-20.png, img-21.png... Sorting these files may not results in desired order as img-10.png shall be next in alphabetical order after img-1.png. Following Python code can be used to rename these files by padding zeros.
def renamePaddingZeros(folderName, file_extn, n_zero, sep_char):
  '''
  Rename all files in specified folder with adding leading zero specified
  by variable n_zero. It can handle any extension type so long there is
  only 1 dot in the file name. It can also handle multiple occurrences
  of separator in the file names. The code exits with user message if no
  suitable file found.
  file_extn: extension of file type such as JPEG, PNG (case sensitive)
  n_zero: number of zeros to be padded
  sep_char: separator character before the image number
  '''
  file_extn_x = "*." + file_extn
  n_char_extn = len(file_extn) + 1
  list_files = sorted (glob.glob(os.path.join(folderName, file_extn_x)))
  if len(list_files) < 2 or n_zero < 2:
    print("Invalid parameters or insufficient inputs. Exiting!\n")
    sys.exit()

  for file_name in list_files:
    num = file_name[: -n_char_extn].split(sep_char)[-1]
    prefix = file_name.rsplit(sep_char, 1)[0]
    num = num.zfill(n_zero)
    new_file_name = prefix + sep_char + num + "." + file_extn
    os.rename (file_name, os.path.join(folderName, new_file_name))
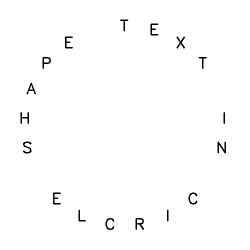
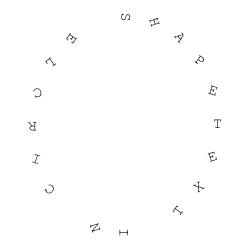
Add text in circular shape similar to 'Circle' text effect of in an Word Art in PowerPoint
def addTextCircularShape(image, text, center, radius, font_scale=1, color=(0, 0, 0), thk=2):
  font = cv2.FONT_HERSHEY_SIMPLEX

  # Calculate angle increment for even distribution
  dq = 360 / len(text)

  for i, char in enumerate(text):
    # Add 270 to start from the top - 0 is at 3 o'clock position in CW
    angle = i * dq + 270
    angle_rad = np.radians(angle)

    # Calculate coordinates on the circle
    x = int(center[0] + radius * np.cos(angle_rad))
    y = int(center[1] + radius * np.sin(angle_rad))

    # Calculate text size to center properly
    text_size, _ = cv2.getTextSize(char, font, font_scale, thk)

    # Adjust coordinates to center text on the circle
    dx = text_size[0] // 2
    dy = text_size[1] // 2
    cv2.putText(image, char, (x - dx, y + dy), font, font_scale, color, thk)
  return image
To add the timer (time elapsed since video started playing), refer to this Python with OpenCV code. Timer can also be added using FFmpeg, scroll down for command line syntax. To add two videos side by side in width direction, refer to this Python + OpenCV code. Note that no padding (gap) between the two videos are added. To add two videos in vertical (up/down) direction, refer to this code. To add 4 videos in 2x2 box, refer to this Python + OpenCV code.. Compress video: ffmpeg -i in.mp4 -vcodec h264 -acodec mp2 out.mp4 or define an alias in Linux .basrc file: cmpvid() {ffmpeg -i "$1" -vcodec h264 -acodec mp2 output.mp4} where $1 is the name of input video and can be used as cmpvid in.mp4 on terminal.
To add 3 videos in a 2x2 row with fourth video (bottom-right) as blank video (video with white background), refer this Python + OpenCV + numPy code. In case the location of fourth video needs to be replaced with an image, refer this Python + OpenCV. Note none of these codes check existence of input specified in the code. These codes can be improvised by adding checks for missing input and option to provide inputs from command line. In case you want to add partition line(s), you may use this code.In case you are not able to play the video created after combining the 3 or 4 videos, try to scale down the input videos. The resultant height and width (twice the size of input videos) may not be displayed on the (laptop or computer) screen you are using.
Sometimes the frame rate per second (FPS) of the input videos needs to be adjusted to a common value. Use this Python+OpenCV code to change the FPS of a video.
Create Video by Rotating an Image: refer to this code.
Programs to edit videos: FFmpeg (written in C), OpenShot and its similar looking cousin program ShotCut, Blender [itself written in C/C++], Windows Video Editor, Movie Maker (not supported beyond Windows-10). FFmpeg is a command-line tool (though few GUI do exist). As per the website ffmpeg.org: "A complete, cross-platform solution to record, convert and stream audio and video." avconv - audio video converter, SimpleCV (a program similar to OpenCV and does not look to be maintained), imageio, MoviePy (uses FFmpeg, imageio, PIL, Matplotlib, scikit-image...), Vapory (library to render 3D scenes using the free ray-tracer POV-Ray), Mayavi, Vispy... HandBrake is a tool for converting video from nearly any format to a selection of modern, widely supported codecs.Excerpts from avconv manual page: avconv is a very fast video and audio converter that can also grab from a live audio/video source. It can also convert between arbitrary sample rates and resize video on the fly with a high quality polyphase filter."
Excerpts from MoviePy documentation: "MoviePy uses the software FFmpeg to read and to export video and audio files. It also (optionally) uses ImageMagick to generate texts and write GIF files. The processing of the different media is ensured by Python’s fast numerical library Numpy. Advanced effects and enhancements use some of Python’s numerous image processing libraries (PIL, Scikit-image, scipy, etc.)". Requires scikit-image for vfx.painting.
Few Tips for Video Editing:
- Review all your footages, images and clips (known as strips in Blender)
- Assemble (i.e. add footages, images, clips... on the timeline inside video editor) and create a rough cut
- Keep the clips long enough (in terms of time duration) to enable addition of various effects and transitions, the duration can be adjusted during finishing operations
- Add transition effects as last operations of the editing process
- Turn snapping of clips ON and OFF as needed
- If you are adding narration of an existing video, add a long transition where topics end - this will give you time to wrap up one topic and move to another
- Add few sections with text and background music - no voice content
- Use keyboard short cuts where a better control with mouse pointer is difficult
- To make end look exactly like start of a clip (also known as Time Symmetrization), make the clip play once forward and once backward.
FFmpeg
Add Metadata: Title, Album, Artist, Year: ffmpeg -i in.mp4 -metadata date="2022" -metadata title="Video on FFMPEG" -metadata album="World Population" -metadata artist="Bharat History" -metadata comment="Video on Absolute Population vs Population Density" -c copy -y output.mp4
Get frame rate: ffprobe -v error -select_streams v -of default=noprint_wrappers=1:nokey=1 -show_entries stream=r_frame_rate in.mp4 - prints frame rate as fraction such as 18912/631. On Linux OS: ffprobe -v quiet -show_streams -select_streams v:0 in.webm | grep "r_frame_rate". CFR: Constant Frame Rate. VFR: Variable Frame Rate. Frames per second and playback speed are nearly same and not exactly same. FPS is the rate at which video was recorded and playback speed is the rate at which it is displayed.List of variables or aliases: in_h ≡ ih: height of input video (out_h, oh for output video), in_w ≡ iw: width of input video (out_w, ow for output video), a = aspect ration = iw/ih, dar = input display aspect ratio, it is the same as (w / h) * sar, line_h, lh = the height of each text line, main_h, h, H = the input height of video, main_w, w, W = the input width of video, For images: iw = input width, ih = input height, ow = output width, oh = output height. W is an FFmpeg alias for the width of the video and w is the alias for the width of the image being overlaid. These can also be referred to as main_w (and main_h) and overlay_w (and overlay_h). n = the number of input frame, starting from 0, rand(min, max) = return a random number included between min and max, sar = The input sample aspect ratio, t = time-stamp expressed in seconds and equals NAN if the input timestamp is unknown, text_h, th = the height of the rendered text, text_w, tw = the width of the rendered text
x and y = the x and y offset coordinates where the text is drawn. These parameters allow the x and y expressions to refer to each other, so you can for example specify y=x/dar. They are relative to the top/left border of the output image. The default value of x and y is "0". For crop operation: x = horizontal position, in the input video, of the left edge of the output video, default = (iw-ow)/2. y = vertical position, in the input video, of the top edge of the output video, default = (ih-oh)/2. Both expressions are evaluated per-frame. crop=100: 200: 25: 50 ≡ crop=w=100: h=200: x=25: y=50.
-r = frame rate, -b:v = bit rate of the video, -b:a = bit rate of the audio stream, -c copy ≡ -codec: copy ≡ -codec copy = streamcopy without decoding or encoding, 0:v = video stream of first input, 1:a = audio stream of second input, -c:v ≡ -codec:v ≡ -vcodec = video codec, -vf and -af aliases for -filter:v (video) and -filter:a (audio), N = current frame count, TB stands for TimeBase which is used to convert from the video time unit to seconds.
PI, E, PHI (Golden ratio) are constants available. '*' works like AND, '+' works like OR.
Filters and Global options - Excerpts from user doc: Complex filtergraphs (such as overlay and amix) are configured with the -filter_complex option. Note that this option is global, since a complex filtergraph, by its nature, cannot be unambiguously associated with a single stream or file. Filters in the same linear chain are separated by commas, and distinct linear chains of filters are separated by semicolons. The points where the linear chains join are labelled by names enclosed in square brackets. Some filters take in input a list of parameters: they are specified after the filter name and an equal sign, and are separated from each other by a colon.
shadowx, shadowy = The x and y offsets for the text shadow position with respect to the position of the text. They can be either positive or negative values. The default value for both is "0". start_number = The starting frame number for the n/frame_num variable. The default value is "0".
- To display media information such as codecs, resolution, duration...: ffmpeg -i in.mp4
- To get more precise duration of video: ffprobe -v error -show_entries format=duration -of default= noprint_wrappers=1: nokey=1 in.mp4
- Increase audio level of a video: ffmpeg -i in.mp4 -filter:a "volume=4.0" out.mp4
- Remove noise (hum, wind, hiss, buzz, crackle) from audio of a video: ffmpeg -i in.mp4 -af "highpass=f=200, lowpass=f=1000" out.mp4 - one can use afftdn filter as well
- Convert video format: ffmpeg -i in.mkv -codec copy out.mp4
- Increase audio level and convert format together: ffmpeg -i in.mkv -filter:a "volume=2.0" out.mp4
- Add static text: ffmpeg -i inVid.mp4 -vf "drawtext = text ='Sampe Text':x = (w-text_w) / 2: y=0.9 * h-text_h/2: fontsize = 20: fontcolor = white" -c:a copy -y outVid.mp4 --- this adds text near the centre-left edge and overwrites any existing file created. fontsize=(h/30) can be used to make font relative to size of the video.
- Add static text using a file: ffmpeg -i inVid.mp4 -vf "drawtext = textfile = Credit.txt :x = (w-text_w) / 2: y=0.9 * h-text_h/2: fontsize = 20: fontcolor = white: box=1: boxcolor=black@0.50: boxborderw=5" -c:a copy -y outVid.mp4 --- this adds a textbox of background color 'black' and transparency 0.50. Note that textbox does not automatically wrap the text, subtitles filter does. In order to use textboxes with line breaks, use a text file and add newline there.
- -filter = simple filtergraph (with linear processing chain for each stream)
- -filter_complex = complex filtergraph with multiple processing chains
- It is must to re-encode to perform any filtering, any attempt at stream copying while filtering is ignored
- File Options:
- -f fmt: force format specified by 'fmt' where Input Devices are - lavfi = Libavfilter input virtual device, openal, oss = Open Sound System input device, pulse = PulseAudio input device, 'Video4Linux2' input video device, x11grab = X11 video input device...
- -f fmt: force format specified by 'fmt' where Output Devices are - alsa = (Advanced Linux Sound Architecture) output device, opengl, oss = Open Sound System output device, pulse = PulseAudio output device...
- -t duration: record or transcode 'duration' seconds of audio/video
- -to time_stop: record or transcode stop time
- Video options:
- -ab bitrate: audio bitrate (use -b:a)
- -b bitrate: video bitrate (use -b:v) - ffmpeg -i in.mp4 -b:v 25k -y out.mp4
- -codec:a:1 is example of stream specifier: here second audio (0, 1, 2...) stream.
- -b:a matches all audio streams
- Empty stream specifier -codec or -codec: matches all streams (video, audio, subtitle...)
- -dn: disable data
- -c[:stream_specifier] - select an encoder (when used before an output file) or a decoder (when used before an input file) for one or more streams. codec is the name of a decoder/encoder or a special value copy (output only) to indicate that the stream is not to be re-encoded
- -q:v is alias for -qscale:v which controls image quality
- -vframes number: set the number of video frames to output
- -r rate: set frame rate (Hz value, fraction or abbreviation)
- -s size: set frame size (W x H or abbreviation)
- -aspect aspect: set aspect ratio (valid entries are "4:3", "16:9" or "1.3333", "1.7777" including double quotes) - floating point number string, or a string of the form num:den, where num and den are the numerator and denominator of the aspect ratio
- -bits_per_raw_sample: number set the number of bits per raw sample
- -vn: disable video
- -vcodec codec: force video codec ('copy' to copy stream)
- -timecode hh:mm:ss[:;.]ff set initial TimeCode value
- -pass n: select the pass number (1 to 3)
- -pix_fmt[:stream_specifier]: Set pixel format
- -vf filter_graph: set video filters where -vf and -filter:v are equal
- Audio options:
- -aframes number: set the number of audio frames to output
- -aq quality: set audio quality (codec-specific)
- -ar rate: set audio sampling rate (in Hz)
- -ac channels: set number of audio channel -> Convert stereo (not suitable for mobiles without earphones) to mono (suitable for mobiles) - ffmpeg -i in_stereo.mp4 lac -ac 1 out_mono.mp4
- -an: disable audio - ffmpeg -i inpVid.mp4 -c copy -an outVid.mp4
- -vol volume: change audio volume (256=normal)
- -af filter_graph: set audio filters
- Subtitle options: The subtitles video filter can be used to hardsub, or burn-in, the subtitles. This requires re-encoding and the subtitles become part of the video itself. Softsubs are additional streams within the file. The player simply renders them upon playback.
- -s size: set frame size (WxH or abbreviation)
- -sn: disable subtitle
- -scodec codec: force subtitle codec ('copy' to copy stream)
- -stag fourcc/tag: force subtitle tag/fourcc [FOUR Character Code]
- -fix_sub_duration: fix subtitles duration
- -canvas_size size: set canvas size (WxH or abbreviation)
- -spre preset: set the subtitle options to the indicated preset
- ffmpeg -i in.mp4 -vf "subtitles = subs.srt:force_style = 'FontName = Arial, FontSize=24'" -vcodec libx264 -acodec copy -q:v 0 -q:a 0 -y outSubs.mp4
- Filter options:
- The nullsrc video source filter returns unprocessed (i.e. "raw uninitialized memory") video frames. It can be used as a foundation for other filters, as the source for filters which ignore the input data.
Quoting and Escaping
- ' and \ are special characters (respectively used for quoting and escaping). In addition to them, there might be other special characters (such as * sometimes is used for AND boolean) depending on the specific syntax where the escaping and quoting are employed.
- A special character is escaped by prefixing it with a \.
- All characters enclosed between '...' are included literally in the parsed string.
- The quote character ' itself cannot be quoted, hence one need to escape it
- Leading and trailing whitespaces, unless escaped or quoted, are removed from the parsed string.
Create an image on the fly: ffmpeg -f lavfi -i color=c=red: size=250x250 -loop 1 -frames:v 1 red_cube.png
FireFox: "No video with supported format and MIME type found" error. Solution: Increase the bit rate and / or use WebM/VP9 video on systems that don't support MP4/H.264 (certain audio and video file types are restricted by patents).Resize all images in a folder in Linux: for i in *.jpg; do ffmpeg -i $i -vf scale="800:-1" ${i} -y; done. Using imagemagick: convert *.TIF -set filename: "%t" %[filename:].jpg
Extract frames of a video every 1 [s]: ffmpeg -r 1 -i in.mp4 -r 1 frames_%05d.png where -r (≡ "-vf fps=1") forces the frame rate to specified value. To extract every frame: ffmpeg -i in.mp4 frame_%05d. Do not extract every frame for a longer duration video: a 30 minute video at 25 FPS shall generate 45,000 images file having total size of 10GB with 250 kB per image. '0' in %05d is required to pad the image sequence with zeros. Extract every tenth frame: ffmpeg -i in.mp4 -vf "select=not(mod(n\,10))" -vsync vfr -q:v 1 frame_10_%03d.jpg. Create a mosaic (collage) of the first scenes having size 160x120 pixels: ffmpeg -i in.mp4 -vf select='gt(scene\,0.4)', scale=160:120, tile -frames:v 1 collage_scenes.pngCreate Videos from Images: Caution- if any one of the input image width/height is odd, ffmpeg shall throw error. filter -stream_loop ≡ loop -1 = infinite loop, 0 = no loop, 2 = loop twice --- from single image: ffmpeg -framerate 25 -loop 1 -i Input.png -c:v libx264 -t 5 -pix_fmt yuv420p -vf scale=480:270 -y Vid_1_image.mp4 - this can be used to insert a break or effect in a video later. To create image slideshow: ffmpeg -framerate 25 -start_number 2 -i Image%03d.png -c:v libx264 -pix_fmt yuv420p Image_Slideshow.mp4. To use all images of specified type: ffmpeg -r 0.5 -pattern_type glob -i '*.jpg' -c:v libx264 -pix_fmt yuv420p -y Slideshow.mp4 where -r 0.5 is used to make each image stay 1/0.5 = 2[s] on the screen.
Images each varying in size: ffmpeg -start_number 2 -i Image%03d.jpg -vf "scale=1280:720: force_original_aspect_ratio = decrease: eval=frame, pad=1280:720 :-1:-1: color = yellow" -y Slideshow_Padded.mp4 or ffmpeg -framerate 1 -pattern_type glob -i '*.png' -loop 1 -vf "scale=800:450: force_original_aspect_ratio = decrease: eval=frame, pad=800:540 :-1:-1: color=gray" -y Slideshow_Padded.mp4 --Note that once you specify frame rate, the duration shall be decided by number of images. Use expression like "trunc(oh/a/2) * 2" to keep the dimension an even number where 'a' is the aspect ratio of the image. In other words: -vf "scale=800:-1" should be replaced by "scale=800: trunc(ow/a/2) * 2". Alternatively use "scale=800:-2". Many examples referenced from stackoverflow.com/.../maintaining-aspect-ratio-with-ffmpeg.
ffmpeg -f image2 -r 0.5 -itsoffset 2 -i img%02d-0.png -y -r 25 img_slow.mp4 - create video with each image staying for 2 [s] (= 1/0.5) on the screen.Loop video frames Loop single first frame infinitely: loop=loop=-1:size=1:start=0, Loop single first frame 10 times: loop=loop=10:size=1:start=0, Loop 10 first frames 5 times: loop=loop=5:size=10:start=0. Encode a gif looping 5 times, with a 2 seconds delay between the loops: ffmpeg -i in.gif -loop 5 -final_delay 200 out.gif
Get the frame number closest to a timestamp: ffmpeg -t 01:25 -i in.mp4 -nostats -vcodec copy -y -f rawvideo /dev/null 2>&1 | grep frame | awk '{print $2}'. Get the frame closest to a timestamp: ffmpeg -ss 00:01:25 -i in.mp4 -frames:v 1 "frame_n.png". Save frames that have more than 60% change compared to previous and generate sequence of 5 images: ffmpeg -i in.mp4 -vf "select=gt(scene\, 0.6)" -frames:v 5 -vsync vfr frames_%03d.jpg
Replace a frame of the video with an image: ffmpeg -i in.mp4 -i frame.png -filter_complex "[1]setpts= 2.50/TB[im]; [0][im] overlay=eof_action=pass" -c:a copy out.mp4 where 2.50 is the timestamp to be replaced. The default FPS is 25. For other FPS: ffmpeg -i in.mp4 -itsoffset 3.5035 -framerate 24 -i frame.png -filter_complex "[0:v:0] [1] overlay= eof_action=pass" out.mp4
Sometime, you may create unknowingly a video that does not play audio on mobile devices, but works fine on desktops or laptops. Sometimes the audio can be heard in mobile using earphones but sometimes not at all (even using earphones). The reason is that desktop clients use stereo (two channels), and the mobile clients use mono (single channel). Video with stereo tracks can be played in case mono track is emulated correctly. When a mono audio file is mapped to play a stereo system, it is expected to play the one channel of audio content equally through both speakers.
Extract Audio
ffmpeg -i in.mp4 -vn -acodec copy out.m4a -Check the audio codec of the video to decide the extension of the output audio (m4a here). From stackoverflow.com: If you extract only audio from a video stream, the length of the audio 'may' be shorter than the length of the video. To make sure this doesn't happen, extract both audio and video simultaneously: ffmpeg -i in.mp4 -map 0:a Audio.wav -map 0:v vidNoAudio.mp4 -As a good practice, specify "-map a" to exclude video/subtitles and only grab audio. Note that *.MP3 and *.WAV support only 1 audio stream. To create a muted video: ffmpeg -i in.mp4 -c copy -an vidNoAudio.mp4 or ffmpeg -i in.mp4 -map 0:v vidNoAudio.mp4To create an mp3 file, re-encode audio: ffmpeg -i in.mp4 -vn -ac 2 out.mp3
Merge an audio to a video without any audio: ffmpeg -i vidNoAudio.mp4 -i Audio.wav -c:v copy -c:a aac vidWithAudio.mp4
Extract one channel from a video with stereo audio: ffmpeg -i in.mp4 -af "pan=mono|c0=c1" mono.m4a
To address the case where a video does not play audio on mobile devices but works fine on desktops, follow these steps: 1. Extract one channel from the video 2. Remove audio from the video - in order words mute the original video 3. Finally merge the audio extracted in step-1 with muted video created in step-2.
Simple Rescaling: ffmpeg -i in.mp4 -vf scale=800:450 out.mp4 --- To keep the aspect ratio, specify only one component, either width or height, and set the other component to -1: ffmpeg -i in.mp4 -vf scale=800:-1 out.mp4 - this scales to width and maintains aspect ratio. To scale based on % of dimensions: "scale=iw*0.5:ih*0.5" where iw and ih are width and height of the input image.
Change playback speed: ffmpeg -i in.mp4 -vf "setpts=2.0*PTS" vid_slower.mp4 - playback speed is halved, setpts = set Presentation Time Stamp (PTS). Following shell scripts loops over all mp4 files and finds maximum duration of the video. Then the script changes playback speeds to make the duration of each video equal. Note: there should be no space before and after equal sign in Bash. Precision of a video is determined by FPS as the time required for a frame to appear is the least count. Thus, a video with FPS = 25 shall have precision of 1/25 = 0.04 [s] and not any smaller number such as 1 [ms].
#!/bin/bash
max_duration=-1.0

#Loop through all videos in current directory and get max duration
for file in *.mp4; do
 dura=$(ffprobe -v error -show_entries format=duration -of default= noprint_wrappers=1: nokey=1 "$file")
 if (( $(echo "$dura $max_duration" | awk '{print ($1 > $2)}') )); then
   max_duration=$dura
 fi
done

calc_float(){ awk "BEGIN { print "$*" }"; }
for file in *.mp4; do
 dura=$(ffprobe -v error -show_entries format=duration -of default= noprint_wrappers=1: nokey=1 "$file")
 speed_factor=$(calc_float $max_duration/$dura)
 #echo "File: $file --> having duration: $dura"

 #Change playback speed: -filter:a "atempo=$speed_factor" for audio
 ffmpeg -i "$file" -filter:v "setpts=$speed_factor*PTS" -an -y "output_$file"
done
Note that FFmpeg doesn't always scale the duration of a clip to the desired value - this is not FFmpeg issue but it has to do with the video itself. The duration of a video stream = PTS of the last frame + duration of the last frame, where PTS (Presentation TimeStamps) is the time from start of video at which a frame appears. To convert a video of original duration t0 = 1.25 to final duration tf = 7.50: ffmpeg -i in.mp4 -filter:v "setpts=(7.50/1.25)*PTS" -an out.mp4 - note that actual duration of new video may not be precisely desired value for clips of short durations. One option is to scale up the video playback duration to higher value say 100 times and them scale back to lower required duration.
FFmpeg Colour Effects: Note 'hue' is the basic color, like red, green, or blue, while 'saturation' is how intense the color is. FFmpeg use saturation and brightness in the range [-10,10]. geq: filter to apply generic equation to each pixel. From user manual:
- Flip the image horizontally: geq=p(W-X\,Y)
- Generate a bidimensional sine wave, with angle PI/3 and a wavelength of 100 pixels: geq=128 + 100*sin(2* (PI/100)* (cos(PI/3)*(X-50*T) + sin(PI/3)*Y)): 128:128
- Generate a fancy enigmatic moving light: nullsrc=s=256x256, geq=random(1) / hypot(X - cos(N*0.07)*W/2 - W/2\, Y-sin(N*0.09)*H/2 - H/2)^2 *1000000*sin(N*0.02): 128:128
- Generate a quick emboss effect: format=gray, geq=lum_expr= '(p(X, Y) + (256-p(X-4 , Y-4)))/2'
- Modify RGB components depending on pixel position: geq=r= 'X/W * r(X, Y)': g='(1-X/W)*g(X, Y)': b='(H-Y)/H*b(X, Y)'
- Create a radial gradient that is the same size as the input (also see the vignette filter): geq=lum= 255*gauss((X/W - 0.5)*3)* gauss((Y/H-0.5)*3) / gauss(0)/gauss(0),format=gray.
To convert video to black and white: GRAYSCALE - ffmpeg -i in.mp4 -vf format=gray out.mp4 or B-W: ffmpeg -i in.mp4 -vf "colorchannelmixer= 0.3:0.4: 0.3: 0:0.3:0.4:0.3: 0:0.3:0.4:0.3" out.mp4
If latest version of FFmpeg is installed in differnt folder (this is applicable as Ubuntu LTS 20.x allows only upto ffmpeg 4.2.7): /usr/local/bin/ffmpeg/ffmpeg -i in.mp4 -vf monochrome="enable= 'between(t, 2, 3)'" -y monochrome.mp4 -- Note that filters like pixelize, monochrome... are not available in v4.2.7.Simple fade-in: ffmpeg -i in.mp4 -vf "fade=t=in:st=0:d=2" -c:a copy -y out.mp4 - starts the video with a black screen and fade in over 2 [s]. ffmpeg -i in.mp4 -vf "fade=t=out:st=5:d=2" -c:a copy out.mp4 - fade out to black over 2 [s] starts at the 5 [s] timestamp. 'st' is short form for start_time and 'd' is short form for duration.
Apply a fade-in/fade-out effect: 0 is the number of the first frame where the effect starts and 30 is the duration in frames of the fade-in effect. 500 is the frame number where the effect starts and 20 is the duration in frames of the fade-out effect: ffmpeg -i in.mp4 -vf "fade=in:0:30,fade=out:500:20" out.mp4
Rotate hue and make the saturation swing between 0 and 2 over a period of 1 second: ffmpeg -i in.mp4 -vf hue="H=2*PI*t: s=sin(2*PI*t)+1" out.mp4
Apply a 3 seconds saturation fade-in effect starting at 0: ffmpeg -i in.mp4 -vf hue="s=min(t/3\,1)" -y out.mp4 --A general fade-in expression is: hue="s=min(0\, max((t-START)/DURATION\, 1))"
Apply a 3 [s] saturation fade-out effect starting at 5 seconds: hue="s=max(0\, min(1\, (8-t)/3))". The general fade-out expression can be written as: hue="s=max(0\, min(1\, (START+DURATION-t)/DURATION))"
lut, lutrgb, lutyuv: Compute a look-up table for binding each pixel component input value to an output value, and apply it to the input video. Expression for this filter does not work with time, 'geq' works with lut*. Examples from user doc:
- Negate input video: lutrgb= "r=maxval + minval-val: g=maxval + minval-val: b=maxval + minval-val" or lutyuv= "y=maxval + minval-val: u=maxval + minval-val: v=maxval + minval-val"
- The above is the same as: lutrgb= "r=negval: g=negval: b=negval" and lutyuv= "y=negval: u=negval: v=negval"
- Negate luma: lutyuv=y=negval
- Remove chroma components, turning the video into a graytone image: lutyuv= "u=128: v=128"
- Apply a luma burning effect: lutyuv="y=2*val"
- Remove green and blue components: lutrgb="g=0: b=0"
- Set a constant alpha channel value on input: format=rgba, lutrgb=a= "maxval-minval/2"
- Correct luma gamma by a factor of 0.5: lutyuv= y= gammaval(0.5)
- Discard least significant bits of luma: lutyuv=y= 'bitand(val, 128+64+32)'
- Technicolor like effect: lutyuv= u= '(val-maxval/2)*2 + maxval/2': v= '(val-maxval/2)*2 + maxval/2'
ffmpeg -i in.mp4 -vf "format=rgba, geq=lum_expr= '(p(X, Y) + (256-p(X-4 , Y-4)))/2': enable= 'between(t, 1, 2)', lutyuv= y=negval: enable= 'between(t, 2, 3)', lutyuv= y=2*val: enable= 'between(t, 3, 4)" -y clr_effect.mp4 - this command generates the video embedded below.
video.stackexchange.com/.../using-ffmpeg-can-i-remove-the-color-from-an-area-of-the-video - To remove color from a portion of video: crop the video, turn it into black and white and then put this as an overlay on itself. ffmpeg -y -i in.mp4 -filter_complex "[0] crop=50:25: 100:75 [cr];[cr] hue=s=0 [cr2]; [0][cr2] overlay=100:75" -map "[cr2]" -vcodec h264_qsv -b:v 12300k out.mp4
Colorkey: removes a color layer - ffmpeg -i in.mp4 -vf "colorkey=green:enable= 'between(t, 1, 5)'" color_key.mp4. The filter colorize overlays a solid color on the video stream. 'colorlevels' filter adjusts video input frames using levels: change brightness, contrast, saturation (light/dark). ffmpeg -i in.mp4 -vf "colorlevels= romin=0.5: gomin=0.5: bomin=0.5: enable= 'between(t, 1, 5)'" bright.mp4
To make an image transparent: ffmpeg -i in.jpg -vf colorkey=white:0.3:0.5 out.png - colorkey has syntax: colorkey= color:similarity:blend. Change 0.3 to 0.01 for only white pixels to get affect. Change 0.5 to 0 for either fully transparent or fully opaque pixels. This method can be used to add shapes such as arrows, circles and curves to a video. ffmpeg -i in.mp4 -i in.png -filter_complex "[1:v]format=argb, colorchannelmixer= aa=0.5[trns]; [0:v][trns]overlay" -vcodec libx264 img_vid.mp4 - 0.5 here is the opacity factor.negate filter: Negate (invert) the input video: ffmpeg -i in.mp4 -vf negate color_negate.mp4
rgbashift - shift R/G/B/A pixels horizontally and/or vertically: ffmpeg -i in.mp4 -vf "rgbashift=rv=-50" -y rgb_shift.mp4
Pixelize or pixelate: ffmpeg -i in.mp4 -vf "monochrome=size=1:enable= 'between(t, 2, 3)', pixelize=w=8:h=8: enable= 'between(t, 3, 4)'" -y mono_pxlz.mp4
from PIL import Image
def pixelateImage(image_path, pixel_size):
  try:
    img = Image.open(image_path).convert("RGB")
  except FileNotFoundError:
    print("Error: Image not found, exiting!")
    exit()
  # Get image shape and calculate new dimensions for downsampling
  wd, ht = img.size
  new_wd = wd // pixel_size
  new_ht = ht // pixel_size

  # Resize (downsample) and then resize image using Image.LANCZOS
  downsampled_img = img.resize((new_wd, new_ht), Image.Resampling.LANCZOS)
  pix_img = downsampled_img.resize((wd, ht), Image.Resampling.NEAREST)

  return pix_img
pix_image = pixelateImage("in.jpg", 5)
pix_image.save("out.jpg")
Add Ripple and Wave Effects: Displace pixels of a source input by creating a displacement map specified by second and third input stream
Ripple: ffmpeg -i in.mp4 -f lavfi -i nullsrc=s=800x450, lutrgb = 128:128:128 -f lavfi -i nullsrc = s=800x450, geq='r=128 + 30 * sin(2*PI*X/400 + T) : g=128 + 30*sin(2*PI * X/400 + T) : b=128 + 30*sin(2*PI * X/400 + T)' -lavfi '[0][1][2]displace' -c:a copy -y outRipple.mp4 --- the size (800x450 in this case) needs to be checked in the source video and specified correctly.
Wave: fmpeg -i in.mp4 -f lavfi -i nullsrc =s= 800x450, geq='r=128 + 80*(sin(sqrt( (X-W/2) * (X-W/2)+(Y-H/2) * (Y-H/2))/220*2*PI + T)) : g=128 + 80*(sin(sqrt( (X-W/2) * (X-W/2)+(Y-H/2) * (Y-H/2))/220*2 * PI+T)):b=128 + 80*(sin(sqrt( (X-W/2) * (X-W/2)+(Y-H/2) * (Y-H/2))/220 * 2*PI+T))' -lavfi '[1]split[x][y], [0][x][y]displace' -y outWave.mp4
Add Texts, Textboxes and Subtitles:
The references, credits and other information can be added to videos using text boxes and subtitles. ffmpeg -i inVid.mp4 -vf "drawtext = textfile ='Credits.txt':x = (w-1.2*text_w): y=0.5 * h-text_h/2: fontsize = 32: fontcolor = white" -c:a copy -y outVid.mp4 --- adds a text box near the centre-right location of the video.
To add subtitles, a SubRip Text file needs to be create with each sections defined as described below:- A number or counter: it indicates the position of the subtitle
- Start and end time of the subtitle separated by '–>' characters, end time can be > the total duration of the video
- Subtitle text in one or more lines, followed by a blank line indicating the end of the subtitle
- The formatting of SRT files is derived from HTML tags though curly braces can be used instead of <...>. Example: <b>...</b> or {b}... {/b}, 'b' can be replaced with 'i' or 'u' for italic or underlined fonts. Font Color <font color= "white"> ... </font>. Line Position {\a5} (indicates that the text should start appearing on line 5).
1
00:00:00:00 --> 00:01:30:00
This video is about usage of FFmpeg to edit videos without any cost
ffmpeg -i inVid.mp4 -vf "subtitles=subs.srt:force_style='Alignment=10, FontName = Arial, FontSize=24, PrimaryColour = &H0000ff&'" -vcodec libx264 -acodec copy -q:v 0 -q:a 0 -y outSubs.mp4 --- Colour Code: H{aa}{bb}{gg}{rr} where aa refers to alpha or transparency, bb, gg and rr stands for BGR channel. The values are hexadecimal numbers: 127 = 16 x 7 + 11 = 7A, 255 = 16 x 15 + 15 = FF. Thus: &H00000000 is BLACK and &H00FFFFFF is WHITE
Subtitles in SubStation Alpha Subtitles file (ASS) format: ffmpeg -i inVid.mp4 -filter_complex "subtitles=Sample.ass" -c:a copy -y outAssSub.mp4 - Click on the link to get a sample ASS file. For a quick summary of tags and their usage in ASS file, refer to this file.
ffmpeg -i in.srt out.ass can be used to convert a SRT file into ASS file. There are few programs such as Subtitle Editor and Aegisub. From the official contents of Aegisub - "Editing subtitles is what Aegisub is made for". Subtitle Editor can be installed in Linux using command: sudo apt-get install subtitle editor. Following code uses a blank image of size 360x180 and add the text in defined in Typewriter.ass file to create a video of duration 10 [s]: ffmpeg -f lavfi -i color=size=360x180: rate=30: color=white -vf "subtitles=Typewriter.ass" -t 10 -y TypewriterEffect.mp4. This statement takes a background image and creates video of duration 10 [s] with text added in typewriter effect: ffmpeg -loop 1 -i TypewriterBkground.png -vf "subtitles=Typewriter.ass" -t 10 -y TypewriterEffect.mp4 --- the \pos tag in *.ASS file controls the initial location of first text. To add the character display time such as {k20} after every character, type the text in VIM editor in Linux and use :%s/\a\zs\ze\a/{\\k20}/g - this will add '{\k20}' after every character. Then use :%s/\ \zs\ze\a/{\\k20}/g to replace spaces with '{\k20}'. Lastly use :%norm A\N or :%norm A\N\N to add single or double newline characters '\N' or '\N\N' at the end of each line. Note that there should be space character before and after \N in *.ass file and all text should be on a single line. {\pos(25,150)} controls the staring location of text in width and height directions respectively.
The ASS format uses centiseconds rather than frames or milliseconds, so when one imports from or export to ASS, the round-off errors may sometimes push timecodes over to the adjacent frame spoiling minimum intervals, shot change gaps, durations... This can be avoided if times in ASS and original video are synchronized carefully. ASS uses HTML type tags. If one tag can't achieve get the desired result, a combination of them can be used - just put them inside a pair of curly brackets. \r resets the style for the text that follow. invisible character \h, \b1 makes your text bold, \fsp changes the letter spacing, \fad produces a fade-in and fade- out effect, \pos (x, y) positions x and y coordinates the subtitle, \frx, \fry, \frz rotate your text along the X, Y and Z axes correspondingly.Reference: www.md-subs.com/line-spacing-in-ssa: Vertical gap between subtitles ASS --- {\org(-2000000, 0)\fr< value>} Text on line one, {\r} \N Text on line two. All you need to do to get the desired line spacing is adjust the \fr value. If you want to bring the lines closer, just make the value negative.
Typewriter Effect using OpenCV and Python: refer to this file which is well commented for users to follow the method adopted. The similar but not exactly same animation of text using moviepy can be found here.
This code can be easily tweaked to generate a vertical scrolling text (such as 'Credits' displayed at the end of video). Note that there is flickering of the text and it can be handled by synchronizing of text speed with frame speed.
Add text to a video using MoviePy
Add Text with Typewriter Effect in FFmpeg without ASS:
ffmpeg -i in.mp4 -vf "[in]drawtext=text='The': fontcolor= orange: fontsize=100: x=(w - text_w)/2+0: y=0: enable= 'between(t, 0, 5)', drawtext = text = 'Typewriter': fontcolor= orange: fontsize=100: x=(w - text_w)/2+20: y=text_h: enable='between(t, 1, 5)', drawtext = text = 'Effect': fontcolor= orange: fontsize=100: x=(w - text_w)/2+40: y=2.5*text_h: enable= 'between(t, 2, 5)' [out]" -y vidTypeWriter.mp4Add Multiple Text Boxes Simultaneously:
ffmpeg -i inVid.mp4 -vf "[in]drawtext = text ='Text on Centre-Left':x = (0.6*text_w): y=0.5 * h-text_h/2: fontsize = 32: fontcolor = black, drawtext = textfile ='Credits.txt':x = (w-1.2*text_w): y=0.5 * h-text_h/2: fontsize = 32: fontcolor = white[out]" -c:a copy -y outVid.mp4 --- Everything after the [in] tag (up to [out] tag) applies to the main source.Fade-in and Fade-Out Text:
ffmpeg -i inVid.mp4 -filter_complex "[0]split [base][text]; [text] drawtext= textfile= 'Credits.txt': fontcolor=white: fontsize=32: x=text_w/2: y=(h-text_h)/2, format=yuva444p, fade=t=in: st=1:d=5: alpha=1, fade=t=out:st=10: d=5: alpha=1 [subtitles]; [base][subtitles]overlay" -y outVid.mp4 --Here 'fade=t=in' is the name of of the transition ('fade=t=out' for fade out), 'st' defined start time and 'd' is to specify duration. A fading effect can be introduced in a video by: ffmpeg -i In.mp4 -vf "fade=t=in: st=0:d=5" -c:a copy Vid_Fade_In.mp4Blinking Text:
ffmpeg -i inVid.mp4 -vf "drawtext = textfile ='Credits.txt': fontcolor = white: fontsize = 32: x = w-text_w*1.1: y = (h-text_h)/2 : enable= lt(mod(n\, 80)\, 75)" -y outBlink.mp4 --- To make 75 frames ON and 5 frames OFF, text should stay ON when the remainder (mod function) of frame number divided by 80 (75 + 5) is < 75. enable tells ffmpeg when to display the text. Show text for 1 second every 3 seconds: drawtext= "fontfile= FreeSerif.ttf: fontcolor=white: x=100: y=x/dar: enable=lt(mod(t\, 3)\, 1): text='Blinking Text'". Draw text with font size dependent on height of the video: drawtext= "text='Test Text': fontsize= h/30: x=(w-text_w)/2: y=(h-text_h*2)".Credits text from a file (refer FFmpeg doc): Show the content of file CREDITS off the bottom of the frame and scroll up: drawtext= "fontsize=20: fontfile=FreeSerif.ttf: textfile=CREDITS: y=h-20*t".
Add a scrolling text from left-to-right
ffmpeg -i inpVid.mp4 -vcodec libx264 -b:a 192k -b:v 1400k -c:a copy -crf 18 -vf "drawtext= text=This is a sample text added to test video :expansion= normal:fontfile= foo.ttf: y=h - line_h-10: x=(5*n): fontcolor = white: fontsize = 40: shadowx = 2: shadowy = 2" -y outVid.mp4 ---Note that the text is added through option -vf which stands for video-filter. no audio re-encoding as indicated by -c:a copy. The expression x=(5*n) positions the X-coordinate of text based on frame number. x=w-80*t (text scrolls from right-to-left) can be used to position the test based on time-stamp of the video. x=80*t makes the text scroll from left-to-right. For example: ffmpeg -y -i inpVid.mp4 -vcodec libx264 -b:a 192k -b:v 1400k -c:a copy -crf 18 -vf "drawtext = text= This is a sample text added to test video :expansion = normal: fontfile = Arial.ttf: y=h - line_h - 10: x=80*t: fontcolor = white: fontsize = 40" outVid.mp4Loop: x = mod(max(t-0.5\,0)* (w+tw)/7.5\,(w+tw)) where t-0.5 indicates that scrolling shall start after 0.5 [s] and 7.5 is duration taken by a character to scroll across the width. In other words, text shall scroll across the video frame in fixed number of seconds and you will not get constant speed regardless of the width of the video. As you can see, x=w-f(t,w..) makes the scrolling from right to left.
R-2-L: ffmpeg -i inpVid.mp4 -vcodec libx264 -b:a 192k -b:v 1400k -c:a copy -crf 18 -vf "drawtext= text = This is a sample text added to test video: expansion= normal: fontfile=Arial.ttf: y=h/2 - line_h-10: x= if(eq(t\, 0)\,w\, if(lt(x\, (0-tw))\, w\, x-4)): fontcolor= white: fontsize= 40" -y outVid.mp4. Here, x= if(eq(t\, 0)\, (0-tw)\, if(gt(x\, (w+tw))\, (0-tw)\, x+4)) should be used for L-2-R.Alternatively: x= if(gt(x\,-tw)\,w - mod(4*n\,w+tw)\,w) for R-2-L and x= if(lt(x\,w)\, mod(4*n\,w+tw)-tw\,-tw) for L-2-R can be used.
Add a scrolling text from right-to-left where text is stored in a file
ffmpeg -i in.mp4 -vf "drawtext= textfile=scroll.txt: fontfile=Arial.ttf: y=h-line_h - 10:x= w-mod(w * t/25\, 2400*(w + tw)/w): fontcolor=white: fontsize=40: shadowx=2: shadowy=2" -codec:a copy output.mp4 ---Note that \, is used to add a comma in the string drawtext. The text to be scrolled are stored in the file scroll.txt, in the same folder where in.mp4 is stored. Place all lines on a single line in the file.Drawbox: drawbox=x=10: y=y=ih-h-5: w=200: h=75: color=red@0.5: thickness=fill where ih = height of the input and h = height of the box, @0.5 sets opacity, thickness = fill to created a box filled with specified color. Draw a filled box for 1 [s] every 2[s]: ffmpeg -i in.mp4 -vf "drawbox= 0:5*ih/10: iw:ih/10: thickness=fill: color=red@0.5: enable= 'lt(mod(t\, 2)\, 1)'" -y out.mp4 - Note that mod function can be used to generated rectangular pulse. For example, IF(MOD(B3, 8) >= 3, 1, 0) generates following signal which ON for 5 [s] and OFF for 3 [s] controlled by values '8' and '3' in the formula.
Sendcmd - Send commands to filters in filtergraph allowing to read and process command list stored in a file (need not have extension .cmd): ffmpeg -i in.webm -filter_complex "[0:v]sendcmd=f=cmd_list.cmd, drawtext= fontfile= FreeSerif.ttf: text='': fontcolor=white:fontsize=100" out.mp4 ---Filters supporting sendcmd can be checked by: ffmpeg -filters and look for a "C" to the left of the filter name. Sample command list adapted from user doc:
# show text in the interval 5-10
5.0-10.0 [enter] drawtext reinit 'fontfile=FreeSerif.ttf:text=Hello World',
         [leave] drawtext reinit 'fontfile=FreeSerif.ttf:text=';

# desaturate the image in the interval 15-20
15.0-20.0 [enter] hue s 0,
          [enter] drawtext reinit 'fontfile=FreeSerif.ttf:text=Hello World Again',
          [leave] hue s 1,
          [leave] drawtext reinit 'fontfile=FreeSerif.ttf:text=Goodbye';

# apply an exponential saturation fade-out effect, starting from time 25
25.0-50.0 [enter] hue s exp(25-t)
This code also works: ffmpeg -i in.webm -filter_complex "[0:v]sendcmd=f=cmd_list.txt, hue" out.mp4 where the file cmd_list.txt contains single line "10 [enter] hue s exp(10-t)" without quote.
Blend (overlap) two videos: Apply 1x1 checkerboard effect: ffmpeg -i in1.mp4 -i in2.mp4 -filter_complex "[0:0] [1:0] blend= all_expr= 'if(eq(mod(X, 2), mod(Y, 2)), A, B)'" -y blend_v1_v2.mp4
Mirror top half to bottom half: ffmpeg -i in.mp4 -vf "split [main][tmp]; [tmp] crop=iw:ih/2:0:0, vflip [flip]; [main][flip] overlay=0:H/2" out_mirrored.mp4 - referenced from FFmpeg user doc.
Reverse Videos: ffmpeg -i in.mp4 -vf reverse vid_rev.mp4, for audio and video: ffmpeg -i in.mp4 -vf reverse -af areverse vid_rev.mp4 - This filter requires memory to buffer the entire clip, so trimming is suggested. Take the first 5 seconds of a clip, and reverse it: trim= end=5,reverse
Merge or Concatenate Videos
Note that following examples assume that all the videos contain audio and are of same size. All video streams should have same resolution. While concatenating audio, all video inputs must be paired with an audio stream. If any video doesn't have an audio, then a dummy silent track has to be used. [0:0]: first stream of the first input, [1:0]: first stream of the second input and so on. To merge by creating clips from multiple videos, refer to this shell script.
Videos can be concatenated by adding them in a list, one file per line, in a text file and using command: ffmpeg -f concat -i vid_clips.txt -c copy vid_merged.mp4 where the vid_clips.txt shall look like:file 'v_01.mp4' file 'blank.mp4' outpoint 1 file 'v_02.mp4' file 'blank.mp4' outpoint 1 file 'v_03.mp4'Send even and odd frames to separate outputs, and compose them: ffmpeg -i in.mp4 -vf "select=n=2:e='mod(n, 2)+1' [odd][even]; [odd] pad=h=2*ih [tmp]; [tmp][even] overlay=y=h" odd_even.mp4
Merge 2 videos: ffmpeg -i v1.mp4 -i v2.mp4 -filter_complex "[0:v:0] [0:a:0] [1:v:0] [1:a:0] concat=n=2:v=1:a=1 [v] [a]" -map [v] -map [a] cat2.mp4 --The -f concat flag can also be used and the names of input videos can be provided either in a text file or through command line pipe. ffmpeg -f concat -i video_list.txt -c copy vids_concat.mp4 or ffmpeg -i "concat vi_1.mp4\|Vid_2.mp4" -c copy vids_concat.mp4.
Alternatively, you can add 4 videos in less than 10 lines of codes using moviepy. The videos of different durations can be used. The following lines of code have not been tested for videos having different spatial dimensions (heights and widths of the videos).
from moviepy.editor import VideoFileClip, clips_array
# Read videos and add 5px padding all around
vid1 = VideoFileClip("vid1.avi").margin(5)
vid2 = VideoFileClip("vid2.mp4").margin(5)
vid3 = VideoFileClip("vid3.avi").margin(5)
vid4 = VideoFileClip("vid4.mp4").margin(5)

# Concatenate the frames of the individual videos and save as mp4
final_clip = clips_array([[vid1, vid2], [vid3, vid4]])
final_clip.resize(width=480).write_videofile("vid4in1.mp4")
xstack: Stack video inputs into custom layout, all streams must be of same pixel format. If inputs are of different sizes, gaps or overlaps may occur. Display 4 inputs into 2x2 grid [[1 3], [2 4]] order: xstack= inputs=4: layout= 0_0| 0_h0| w0_0| w0_h0. Display 4 inputs into 1x4 grid (vertical stack), if inputs are of different widths unused space will appear: xstack= inputs=4: layout= 0_0| 0_h0| 0_h0+h1| 0_h0+h1+h2.
To concat with transition effects such as fade-in or fade-out: there are long and complex commands available. One round-about process is to create transition effects in each video separately (specify duration as half of the desired transition) and then concatenate them as described above. Example: ffmpeg -i v1.mp4 -i v2.mp4 -filter_complex "[0:v] setpts=PTS-STARTPTS[v0]; [1:v] fade=in: st=0: d=3: alpha=1, setpts=PTS - STARTPTS + (5/TB)[v1]; [v0][v1]overlay [fade_v]" -c:v libx264 -map "[fade_v]" Vid_Cross_Fade.mp4 - the resolutions (w x h) of the two videos should be same, PTS = Presentation Time Stamp, TB = Time Base ~ 1/FPS. Fade in starts at beginning of second video and have duration of 3 [s]. [v0][v1]overlay [fade_v] = take video compositon v0 and v1, overlay and store in video composition fade_v. Refer stackoverflow.com/.../what-is-video-timescale-timebase-or-timestamp-in-ffmpeg to know more.Overlay a moving image over a video: ffmpeg -i in.mp4 -i in.jpg -filter_complex "[0][1] overlay=x= if(lt(t\, 0)\, t*2\, t*100)[out]" -map '[out]' -y out.mp4 - there the value 200 in t*100 is selected based on total displacement in x-direction over desired time interval. For example, if an image of width 200 px is to travel from left to right on video of width 800 px and duration 5 [s], the value would be [800 + 200] / 5 = 200.
unix.stackexchange.com/.../how-to-transition-smoothly-and-repeatedly-between-two-videos-using-command-line: ffmpeg -i v1.mp4 -i v2.mp4 -filter_complex "[0:0][1:0] blend= all_expr= 'if(mod(trunc(T), 2), A, B)'" v1_v2_mixed.mp4 -- creates muted video mixing, mod(trunc(T), 2) creates clips of 1 seconds each, increase 2 to 3 or 5 to get clips with longer durations. Use if(gte(mod(trunc(T), 4), 2), A, B) to take clips of duration 2 seconds. Each clip of 2 seconds with 0.5 [s] of transition: ffmpeg -i in1.mp4 -i in2.mp4 -filter_complex "[0][1] blend= all_expr= 'if(mod(trunc(T/2), 2), min(1, 2*(T - 2 * trunc(T/2))), max(0, 1-2*(T - 2 * trunc(T/2)))) * A + if(mod(trunc(T/2), 2), max(0, 1-2*(T - 2*trunc(T/2))), min(1, 2*(T - 2*trunc(T/2)))) * B'" v1_v2_mixed.mp4
Merge 3 videos: ffmpeg -i v1.mp4 -i v2.mp4 -i v3.mp4 -filter_complex "[0:v:0] [0:a:0] [1:v:0] [1:a:0] [2:v:0] [2:a:0] concat=n=3: v=1:a=1 [v] [a]" -map [v] -map [a] -y cat3.mp4. For videos without an audio: ffmpeg -i 1.mp4 -i 2.mp4 -i 3.mp4 -filter_complex "[0:v] [1:v] [2:v] concat=n=3:v=1:a=0" -y cat3.mp4
Merge 5 videos with audio:ffmpeg -i 1.mp4 -i 2.mp4 -i 3.mp4 -i 4.mp4 -i 5.mp4 -filter_complex "[0:v] [1:v] [2:v] [3:v] [4:v] concat=n=5:v=1:a=0" -y cat5.mp4
Merge 2 videos after scaling: ffmpeg -i v1.mp4 -i v2.mp4 -filter_complex "[0:v:0] scale=960:540 [c1]; [1:v:0] scale=960:540[c2], [c1] [0:a:0] [c2] [1:a:0] concat=n=2: v=1:a=1 [v] [a]" -map "[v]" -map "[a]" -y scat.mp4
Merge 2 videos after scaling - the second video contains no audio: ffmpeg -i v1.mp4 -i v2.mp4 -f lavfi -t 0.01 -i anullsrc -filter_complex "[0:v:0]scale=960:540[c1]; [1:v:0] scale=960:540[c2], [c1] [0:a:0] [c2] [2:a] concat=n=2: v=1:a=1 [v] [a]" -map "[v]" -map "[a]" -y cat2.mp4 ---Note: the value of -t (in this example 0.01 second) have to be smaller or equal than the video file you want to make silence otherwise the duration of -t will be applied as the duration for the silenced video. [2:a] in this case means the second input file does not have an audio (the counter starts with zero).
Segment Filter
Split single input stream into multiple streams. This filter does opposite of concat filters: segment works on video frames, asegment on audio samples.Add progress time-stamp at top-right corner in HH:MM:SS format --- ffmpeg -i in.mp4 -vf "drawtext = expansion = strftime: basetime = $(date +%s -d'2020-12-01 00:00:00')000000: text = '%H\\:%M\\:%S'" -y out.mp4 where \\: is used to escape the : which would otherwise get the meaning of an option separator. strftime format is deprecated as in version 4.2.7.
Another method that requires some formatting of the time is: ffmpeg -i in.mp4 -vf drawtext = "fontsize=14: fontcolor = red: text='%{e\:t}': x = (w - text_w): y = (h - text_h)" -y out.mp4Sequences of the form %{...} are expanded. The text between the braces is a function name, possibly followed by arguments separated by ':'. If the arguments contain special characters or delimiters (':' or '}'), they should be escaped such as \: to escape colon. The following functions are available:
- expr, e: The expression evaluation result.
- expr_int_format, eif: Evaluate the expression's value and output as formatted integer. The first argument is the expression to be evaluated, just as for the expr function. The second argument specifies the output format. Allowed values are 'x', 'X', 'd' and 'u'. They are treated exactly as in the printf function. The third parameter is optional and sets the number of positions taken by the output. It can be used to add padding with zeros from the left.
- pts: The timestamp of the current frame. It can take up to three arguments. The first argument is the format of the timestamp; it defaults to flt for seconds as a decimal number with microsecond accuracy; hms stands for a formatted [-]HH:MM:SS.mmm timestamp with millisecond accuracy. gmtime stands for the timestamp of the frame formatted as UTC time;
Put the time-stamp at bottom-right corner: ffmpeg -i in.mp4 -vf drawtext= "fontsize=14: fontcolor = red: text = '%{eif\:t\:d} \[s\] ':x = (w-text_w): y = (h-text_h)" -y out.mp4
Freeze Effect: Using the loop filter, the frame is freezed for 1/2 [s] at 1 [s] and 2 [s] timestamps ignoring audio. ffmpeg -i in.mp4 -vf "loop=12: size=1: start=24, setpts= N/FRAME_RATE/TB, loop=12: 1: 60, setpts= N/FRAME_RATE/TB" Freeze_Effect.mp4. Here, FPS = 24, freeze duration d1 = d2 = 0.5 [s], 12 = 24*0.5, t1 = 1 [s], t2 = 2[s], 24 = t1 x FPS, 60 = FPS x [d1 + t2] and so on. Following video was editing using similar linear chain of loop filters. Note that audio was not expanded to sync with extended duration of the video due to freeze effect.
Overlay an image onto a video at a certain timestamp say 5 [s] and make video pause for specified duration say 3 [s] with the overlay: ffmpeg -i in.mp4 -i overlay.png -filter_complex "[0]trim=0:5, loop=3*25: 1:5*25, setpts= N/FRAME_RATE/TB [ovlay]; [0]trim=5, setpts= N/FRAME_RATE/TB [post] [ovlay] [1] overlay [pre]; [pre][post] concat" out.mp4Timestamp Cut or Trim Videos sometime also referred as "Timeline Editing"
There is a difference in between Crop and Trim operations. Crop refers to spatial trimming whereas Cut or Trim refers to timestamp trimming. Following lines of code shall fail if the dimension of new video exceeds beyond the dimensions of original video. The crop filter will automatically center the crop location if starting position (x, y) are omitted. Note: With 'copy' option, the audio and video gets out of sync (not always time-accurate where audio is accurate enough but the video stops or ends half to few seconds early or late). This is because ffmpeg can cut the video only on keyframes and hence audio is almost precise, while video is not. Add "-async 1" which requires re-encoding though. Another option is to use "-ss position" for output: from FFMPEG docs - "When used as an input option (before '-i'), it seeks position in the input file. When used as an output option (before the output file name), decodes but discards input until the timestamps reach position."
Cut a video from specified start point and duration: ffmpeg -i in.mp4 -ss 00:01:30 -t 00:02:30 -c:v copy -c:a copy trimmed.mp4 -Here '-ss' specifies the starting position and '-t' specifies the duration from the start position, -t "0.25*t" can be used to specify duration as one-fourth of total duration of the video. For increased accuracy to milli-seconds, use Sexagesimal format "Hour:MM:SS.Millisecond" such as 00:01:30.125.
Error may occur if input video is *.webm format: "opus in MP4 support is experimental, add '-strict -2' if you want to use it." Keep same output format i.e. trimmed.webm instead of trimmed.mp4
As explained earlier "-c:v copy" and "-c:a copy" prevent re-encoding while copying. "-sseof -10" can be used to keep only the last 10 seconds of a video, note the negative sign. ffmpeg -ss 00:07:30 -to 00:12:30 -i input.mp4 -c copy -y trimmed_vid.mp4 - to cut the video between two timestamps. Equivalent statements in MoviePy is clip = VideoFileClip( "in.mp4" ).subclip(90, 150); clip.write_videofile( "trimmed.mp4" )
The moov atom is a unique component of the file that specifies the timeline, duration, display properties, and subatoms carrying data for each track in the video. To move the "moov atom" to the beginning of the video file using FFMpeg: ffmpeg -i in.mp4 -vcodec copy -acodec copy -movflags faststart out.mp4
For time line editing, select is a versatile filter which "selects frames to pass in output". Option expr or e is evaluated for each input frame. If the expression is evaluated to zero, the frame is discarded. between(x, x1, x2) returns 1 if x is ≥ x1 and ≤ x2, 0 otherwise. For example, multiple time stamps can be specified as: select='not(mod(n\, 10))' which select a frame every 10 seconds. Select frames with a minimum distance of 5 [s]: select='isnan(prev_selected_t) + gte(t - prev_selected_t\, 5)'. How to create multiple interval ranges starting at 's', with duration 'd' and gap between each duration 'g'?
Ival - start value  -  end value
1    - s            -  s+d
2    - s+d+g        -  s+2d+g
3    - s+2d+2g      -  s+3d+2g
.
n+1  - s+nd+ng      -  s+(n+1)d+ng
Mix clips from two videos: find out the duration of each video and create equal number of clips. Need to adjust the number 3.5 and 2.0 in following commands which should be = "duration of video / number of clips". For video-1: ffmpeg -i in1.mp4 -c:v libx264 -force_key_frames "expr: gte(t, n_forced * 3.5)" -f segment -segment_time 3.5 -reset_timestamps 1 -map 0 clip_1_%d.mp4. For video-2: ffmpeg -i in2.mp4 -c:v libx264 -force_key_frames "expr: gte(t, n_forced * 2.0)" -f segment -segment_time 2.0 -reset_timestamps 1 -map 0 clip_2_%d.mp4. Once desired clips are generated, use the following shell script:
clips1=(clip_1_*.mp4); clips2=(clip_2_*.mp4)
n1=${#clips1[@]}; n2=${#clips2[@]}
cp ${clips1[0]} -f Vid_Mix.mp4
for ((j = 0; j < $n1; j++)); do
 for ((k = 0; k < $n2-1; k++)); do
  if [ $j -eq $k ]; then
   ffmpeg -i Vid_Mix.mp4 -i ${clips2[$j]} -filter_complex "[0:v] [1:v] concat=n=2:v=1:a=0" -y Vid_Mix_n.mp4
   ffmpeg -i Vid_Mix_n.mp4 -i ${clips1[$k+1]} -filter_complex "[0:v] [1:v] concat=n=2:v=1:a=0" -y Vid_Mix.mp4
  fi
 done
done
rm -f Vid_Mix_n.mp4
The duration for which an effect should be applied is controlled by enable keyword: ffmpeg -i in.mp4 -vf "smartblur=lr=5: enable= 'between(t, 1, 5)'" smart_blur.mp4 - blurs the video without impacting the outlines between timestamps 1 to 5 [s]. Note that smartblur filter works on radius, strength and threshold values of luma, chroma and alpha parameters. cr = chroma_radius, as = alpha_strength and so on. Value between 0 to 1 blurs, value between -1 to 0 sharpens.
Spatial Crop Videos
Crop a video starting from x (width direction) = 50 and y (height direction) = 75 with new dimension of video as 320x180: ffmpeg -i in.mp4 -filter:v "crop=320:180:50:75" -c:a copy cropped.mp4. crop=320:180:50:75 ≡ crop=w=320: h=180: x=50: y=75
Crop a video starting from bottom left corner with new dimension of video as 480x270: ffmpeg -i in.mp4 -filter:v "crop = 480:270:0:in_h" -c:a copy -y cropped.mp4
Crop a video to keep the middle 800 pixels of its height, while keeping original width: ffmpeg -i in.mp4 -vf "crop=in_w:800:0:(in_h-800)/2" out_800.mp4Crop left-half of a video: ffmpeg -i in.mp4 -filter:v "crop = in_w/2: in_h: 0: in_h" -c:a copy -y cropL.mp4 -In OpenShot, videos can be cropped by adding effect 'Crop' and adjusting the crop dimensions from left, right, top and bottom. As explained earlier, in_h and in_w are standard keyword denoting height and width of the inputs.
Crop right-half of a video: ffmpeg -i in.mp4 -filter:v "crop = in_w/2: in_h: in_w/2: in_h" -c:a copy -y cropR.mp4 --Crop from the centre of a video: ffmpeg -i in.mp4 -vf "crop=800:450: (iw-800)/2:(ih-450)/2" centre_cropped.mp4 --Note that both iw and in_w represent the same variable: width of input image.
From user manual: "crop=in_w/2: in_h/2: (in_w-out_w)/2 + ((in_w-out_w)/2) * sin(n/10): (in_h-out_h)/2 + ((in_h-out_h)/2) * sin(n/7)" to apply trembling effect. "crop=in_w/2: in_h/2: (in_w-out_w)/2 + ((in_w-out_w)/2) * sin(t*10): (in_h-out_h)/2 +((in_h-out_h)/2) * sin(t*13)" to apply erratic camera effect based on timestamp.
Rotate Videos: rotate clockwise 90° - ffmpeg -i in.mp4 -vf "transpose=clock" -c:a copy -y rotated_vid.mp4 or ffmpeg -i in.mp4 -vf "rotate=PI/2" -c:a copy -y rotated_vid.mp4. transpose = cclock_flip (counter clock-wise and vertical flip), cclock, clock_flip are other options. To rotate by 180° use, ffmpeg -i in.mp4 -vf "transpose=clock, transpose=clock" -c:a copy -y rotated_vid.mp4. Video files have a metadata 'rotation' which is used by video players to rotate the content: ffmpeg -i in.mp4 -map_metadata 0 -metadata:s:v rotate="90" -codec copy -y rotated_vid.mp4
Overlay two videos side-by-side: ffmpeg -i cropL.mp4 -i cropR.mp4 -filter_complex hstack -c:v libx264 -y overLay.mp4 - this may result in loss of audio. To stack vertically: ffmpeg -y -i top.mkv -i bot.webm -filter_complex '[0] scale=480:-1[a]; [1]scale=480:-1[b]; [a][b]vstack' vert_stack.mp4
Overlay where the overlay entity (image or video) moves and changes location according to time: ffmpeg -i in1.mp4 -i in2.mp4 -filter_complex "[0][1]overlay=x= if(lt(t\, 1)\, t*50\, t*100)[out]" -map '[out]' -y moving_overlay.mp4 - note that the factor 50 and 100 needs to be adjusted based on video duration and width. y='if(gte(t, 3), (t-3)*250, 0)' can eb used to add a delay of 3 [s].Overlay two videos side-by-side creating a video larger than the combined size of input videos: ffmpeg -i cropL.mp4 -vf "movie = cropR.mp4 [in1]; [in]pad = 640*2:450[in0]; [in0][in1] overlay = 600:0 [out]" -y newOverlay.mp4 -Here new video has size [W x H] = 640 * 2:450 and the second video is placed at X = 600. Ensure that the new dimension on new video is able to contain both the videos. Alternatively: ffmpeg -i left.webm -i right.mkv -filter_complex '[0]scale=-2:360[a]; [1]scale=-2:360[b]; [a][b]hstack' overlay_2.mp4 - the '-2' option prevents "width not divisible by 2" error.
Overlay video with audio merge: ffmpeg -i left.mp4 -i right.mp4 -filter_complex "[0:v][1:v] hstack=inputs=2[v]; [0:a][1:a] amerge[a]" -map "[v]" -map "[a]" -ac 2 output.mp4 - amerge combines the audio from both inputs into a single, multichannel audio stream, and -ac 2 makes it stereo.
Overlay a logo (image) on a video for specified duration: ffmpeg -i in.mp4 -i Logo.png -filter_complex "[0:v][1:v] overlay = W - 50:25: enable = 'between(t, 0, 20)'" -pix_fmt yuv420p -c:a copy -y out.mp4 -> enable= 'between(t, 0, 20)' means the image shall be shown between second 0 and 20.
W is an FFmpeg alias for the width of the video and w is the alias for the width of the image being overlaid. Ditto for H and h. These can also be referred to as main_w (and main_h) and overlay_w (and overlay_h). "-itsoffset 10" can be used to delay all the input streams by 10 second. If the input file is 120 seconds long, the output file will be 130 seconds long. The first 10 seconds will be a still image (first frame). A negative offset advances all the input streams by specified time. This discards the last 10 seconds of input. However, if the input file is 120 seconds long, the output file will also be 120 seconds long. The last 10 seconds will be a still image (last frame). ffmpeg -i in.png -vf scale= iw*2: ih*2 out.png scales the image two-times the original dimensions. Thus: bottom-left corner: overlay= x=0:y=(main_h - overlay_h), top-right corner: overlay=x=(main_w-overlay_w):y=0, centre: overlay=x=(main_w-overlay_w)/2:y=(main_h-overlay_h)/2.
Overlay multiple images on a video each for different time durations: ffmpeg -i in.mp4 -i Img-1.png -i Img-2.jpg -i Img-3.jpg -filter_complex "[0][1] overlay= enable= 'between(t, 0, 15)': x=0: y=0[out]; [out][2] overlay= enable= 'between(t, 30, 60)': x=0: y=0[out]; [out][3] overlay= enable= 'between(t, 75, 90)': x=0: y=0[out]" -map [out] -map 0:a -acodec copy -y out.mp4 -> Make sure that the video duration is not exceeded while specifying duration of overlay. To make the images appear on the top-right corner, replace x=0 with x=W-w.
Overlay 4 videos in 2 x 2 array: ffmpeg -y -i vid_1.mp4 -i vid_2.mp4 -i vid_3.mp4 -i vid_4.mp4 -filter_complex "[0:0]pad= iw*2:ih*2 [a]; [1:0]null [b]; [2:0]null [c]; [3:0]null [d]; [a][b] overlay=w[x]; [x][c] overlay=0:h[y]; [y][d] overlay=w:h" vid_2x2.mp4
From user doc: Apply transition from bottom layer to top layer in first 10 seconds: blend=all_expr= 'A*(if(gte(T, 10), 1, T/10)) + B*(1-(if(gte(T, 10), 1, T/10)))'. Apply linear horizontal transition from top layer to bottom layer: blend=all_expr= 'A*(X/W) + B*(1-X/W)'. Apply 1x1 checkerboard effect: blend=all_expr= 'if(eq(mod(X, 2),mod(Y, 2)), A, B)'. Apply uncover left effect: blend=all_expr= 'if(gte(N*SW + X, W), A, B)'. Apply uncover down effect: blend=all_expr= 'if(gte(Y-N*SH, 0), A, B)'. Apply uncover up-left effect: blend=all_expr= 'if(gte(T*SH*40 + Y, H)*gte((T*40*SW + X)*W/H, W), A, B)'. Split diagonally video and shows top and bottom layer on each side: blend=all_expr= 'if(gt(X, Y*(W/H)), A, B)'. Display differences between the current and the previous frame: tblend= all_mode= grainextract
Overlay a GIF animation on video: ffmpeg -i in.mp4 -stream_loop -1 -i overlay.gif -filter_complex "[0][1] overlay=x=0: y=0: shortest=1" out.mp4 where -stream_loop -1 results in an infinitely long video if we do not tell FFmpeg to stop the video at the end of the input video. shortest = 1 states that the resulting video should never be longer than the shortest input specified.
Pillarboxing: Reference: superuser.com/questions/547296/... Scale with pillarboxing (the empty space on the left and right sides are filled with specified colour). Letterboxing is when empty space all around the image is filled with specified colour. ffmpeg -i in.png -vf "scale = 800:450: force_original_aspect_ratio = decrease, pad = 1200:450:-1:-1: color = red" -y out_pad_red.png --To pad with green at the top or left, and blue at bottom or right: "pad= (iw+max(iw\,ih))/2: (ih+max(iw\,ih))/2: 0:0:color= blue, pad=max(iw\,ih): ow:(ow-iw): (oh-ih): color=green".
Scale and pad: ffmpeg -i in.jpg -filter_complex "scale= iw*min(800/iw\, 450/ih): ih*min(800/iw\, 450/ih), pad= 800:450: (800-iw*min(800/iw\, 450/ih))/2: (450-ih*min(800/iw\, 450/ih))/2:white, format=rgb24" img_padded.jpg
The syntax of pad is W:H:x:y:color, where W and H set the size of the new canvas, and x,y defines where the original video is placed in the canvas, measured from the top-left. Default for x, y is 0. Default color is black.Crop the excess area:
force_original_aspect_ratio = disable: Scale the video as specified and disable this feature.
ffmpeg -i in.png -vf "scale = 800:450: force_original_aspect_ratio = increase, crop = 800:450" -y out_crop.pngffmpeg -i in.png -vf "scale = 800:450:force_original_aspect_ratio = decrease, pad = 1200:450: (ow-iw)/2: (oh-ih)/2" -y out_pad_var.png
Place a still image before the first frame of a video: Reference stackoverflow.com/questions/24102336...
ffmpeg -loop 1 -framerate 25 -t 5 -i img.png -t 5 -f lavfi -i aevalsrc=0 -i in.mp4 -filter_complex "[0:0] [1:0] [2:0] [2:1] concat=n=2: v=1:a=1" -y out.mp4 -> this assumes that the size of image and video are same.-loop 1 -framerate FPS -t DURATION -i IMAGE: this basically means: open the image, and loop over it to make it a video with DURATION seconds with FPS frames per second. The reason you need it to have the same FPS as the input video is because the concat filter we will use later has a restriction on it.
-t DURATION -f lavfi -i aevalsrc=0: this means - generate silence for DURATION (aevalsrc=0 means silence). Silence is needed to fill up the time for the splash image. This isn't needed if the original video doesn't have audio.
-filter_complex '[0:0] [1:0] [2:0] [2:1] concat=n=2: v=1:a=1': this is the best part. You open file 0 stream 0 (the image-video), file 1 stream 0 (the silence audio), file 2 streams 0 and 1 (the real input audio and video), and concatenate them together. The options n, v, and a mean that there are 2 segments, 1 output video, and 1 output audio.
Zoom-Pan Image into a Video:
The simplest version without any scaling of the input image and zoom-pan around top left corner - ffmpeg -loop 1 -i image.png -filter_complex "zoompan= z= 'zoom+0.002': x=0:y=0: d=250: fps=25[out]" -acodec aac -vcodec libx264 -map [out] -map 0:a? -pix_fmt yuv420p -r 25 -t 4 -s "800x640" -y zoopTopLeft.mp4 --- The value 0.002 is zoom factor which can be increased or decreased to make the zoom effect faster or slower. d=250 is the duration (number of frames) of zooming process and -t 4 is the duration of the output video. Change x=0:y=0 to x=iw:y=ih for zoom-pan about bottom right corner. Note that zoompan, by default, scales output to hd720 that is 1280x720 (and at 25 fps).ffmpeg -loop 1 -i image.png -vf "scale = iw*2:ih*2, zoompan=z= 'if(lte(mod(on, 100), 50), zoom+0.002, zoom - 0.002)': x = 'iw/2-(iw/zoom)/2': y = 'ih/2 - (ih/zoom)/2': d = 25*5: fps=25" -c:v libx264 -r 25 -t 4 -s "800x640" -y zoomInOut.mp4 --- In each 100-frame cycle, this will zoom in for first 50 frames, and zoom out during the rest. For just 1 zoom-in and zoom out event, adjust the values based on duration and frame rate per second (-t 4 and -r 25 respectively in this example). While running this you may get the message "Warning: data is not aligned! This can lead to a speed loss" though the output video shall get generated without any issue. In case you do not want to scale the video, remove -s "800x640". The option scale = iw*2:ih*2 scales the image before zoom-pan. It is recommended to set the aspect ratio of zoom-pan equal to that of the image.
The zoom-in and zoom-out operation described above can also be performed in OpenCV + Python. The sample code can be found here. The outputs shall look like shown below. This is also known as Ken Burns effect after the original inventor. Zoom to centre: ffmpeg -loop 1 -i in.jpg -y -filter_complex "[0] scale=800:-2, setsar=1:1[out]; [out] crop=800:450[out]; [out] scale=8000:-1, zoompan=z='zoom+0.001': x=iw/2 - (iw/zoom/2): y=ih/2 - (ih/zoom/2): d=250: s=800x450: fps=25 [out]" -map [out] -map 0:a? -pix_fmt yuv420p -r 25 -t 10 Ken_Burns_Effect.mp4 -- Ref: bannerbear.com/blog/how-to-do-a-ken-burns-style-effect-with-ffmpeg.Run FFmpeg commands from Python: ffmpeg-python and PyAV are Python wrappers for FFmpeg libraries.
import subprocess
# Convert an MP4 to AVI
input = "input.mp4"
output = "output.avi"
cmd = ["ffmpeg", "-i", input, output]
try:
  subprocess.run(cmd, check=True)
  print(f"Conversion successful: {input} to {output}")
except subprocess.CalledProcessError as e:
  print(f"Error during conversion: {e}")

# Extract a thumbnail at 15 seconds
input = "input.mp4"
output = "thumbnail.png"
cmd = ["ffmpeg", "-i", input, "-ss", "00:00:15", "-vframes", "1", output]
try:
  subprocess.run(cmd, check=True)
  print(f"Thumbnail extracted: {output}")
except subprocess.CalledProcessError as e:
  print(f"Error extracting thumbnail: {e}")
Animations like PowerPoint
Note that most of the transition animations can be achieved using FFMPEG overlay filter documented here.
A sample code with many functions to generate 10 different transitions like PowerPoint can be found here.
This Python and OpenCV code is intended to create functions to generate the animations available in Microsoft PowerPoint. The first category of animations are [Wipe, Split, Fly In, Float In, Rise Up, Fly Out, Float Down, Peek In, Peek Out]. All of these look similar and they differ in speed and direction of entrance. The other set is [ Shape, Wheel, Circle, Box, Diamond ] where the image needs to be in non-orthogonal directions. The third set of animation is [Stretch, Compress, Zoom, Glow and Turn, Pin Wheel] - all of these operations are performed on entire image. The animations in PowerPoint are categories by Entrance, Emphasis and Exit. Another example to animate the images by Split in Vertical direction is shown below. The Python + OpenCV code can be downloaded from this link. This effect is known as Bars in OpenShot where the initial crop from 4 sides are controlled by top, right, bottom and left sizes.Animations of images by split in diagonal directions are shown below. This effect is available under transitions in OpenShot by name Wipe Diagonal n where n = 1, 2, 3, 4 based on the direction of sweep. The Python + OpenCV code can be downloaded from this link. As you can see, the animation stops at the diagonal line starting from TOP-LEFT corner that is element [0, 0] of the arrays. This code can be used to create animation from BOTTOM-LEFT to TOP-RIGHT edge of the image and vice versa.
By design, the lower and upper triangulation is implement by considering diagonal created from top-left corner to bottom-right corner of the array. Hence, the array flip operation can be used to create animation from bottom-left to top-right corner. This Python + NumPy + OpenCV code contains 4 functions to create animations from the 4 corners of an image. Sample output is also shown in the video below.
PowerPoint Box Animation
The Python + OpenCV code demonstrates a method to create animations similar to MS PowerPoint Box option. The text file can be downloaded from this link. There are many improvements required in this code such as checks to ensure all the pixels in width and height directions are covered. Some are checks for existence of file, remove alpha layer in input image, option to convert coloured image in grayscale, scale the image, save as video... This code is a good demonstration of slicing of arrays in NumPy along with use of numpy.insert and numpy.append operations. Creation of sub-matrix and cropping of an image while maintaining size same as input image can also be achieved with this piece of code.
As per PowerPoint documents: "Blinds entrance = Text or object comes into view from behind vertical or horizontal window blinds". Following Python code can be used to generated frames for this animation.def blindEntrancePPT(image, num_frames=60):
img= cv2.imread(image)
blind_height = height // num_frames
img_frame = []
for i in range(num_frames):
frame = np.ones((height, width, 3), dtype=np.uint8) * 255
for j in range(i + 1):
y_start = j * blind_height
frame[y_start:y_start + blind_height] = img[y_start:y_start + blind_height]
img_frame.append(frame)
return img_frame
The code for box animation written in Python function can be found here. To create animations using either vertical or horizontal segments of an image, refer to this code. Another set of functions to create Box animations are in this file.
def frames_box_transition (img1, img2, img_w, img_h, steps=50):
  transition_frames = []
  for i in range(steps):
    frame1 = np.zeros((img_h, img_w, 3), dtype=np.uint8)
    x_tl  = (img_w // 2) * i // steps
    x_br = img_w - x_tl
    y_tl  = (img_h // 2) * i // steps
    y_br = img_h - y_tl

    # Scale-down image and fill remaining space with black colour
    frame1[y_tl:y_br, x_tl:x_br] = cv2.resize(img1, (x_br-x_tl, y_br-y_tl))
    # Fill images from centre outwards
    frame2 = img2.copy()  # "frame2 = image" shall not work
    frame2[y_tl:y_br, x_tl:x_br] = 0

    combined_frame = np.maximum (frame1, frame2)
    transition_frames.append(combined_frame)
  return transition_frames
A more complicated animation is 'Circle' version of PowerPoint. It requires use of trigonometric functions to generate the animations like shown below. This effect is known as Ray Light in OpenShot especially Ray Light 9 and Ray Light 12 are similar to what is shown below.
Opposite to Box effect is the Zoom animation. As per Microsoft documents: " Zoom entrance = Text or object zooms into view from a distance". Following function can be used to generate frames of an image to create Zoom effet.
def zoom_entrance(image, start_scale=0.1, n_frames=60):
  img = cv2.imread(image)
  height, width, _ = img.shape
  zoom_frames = []
  for i in range(n_frames):
    # Calculate the scaling factor for the current frame
    scale = start_scale + (1.0 - start_scale) * (i / n_frames)

    # Resize the image
    zoomed_img = cv2.resize(img, (0, 0), fx=scale, fy=scale)
    zoom_h = zoomed_img.shape[0]
    zoom_w = zoomed_img.shape[1]
    # Get the coordinates to center the resized image
    x_offset = (width  - zoom_w) // 2
    y_offset = (height - zoom_h) // 2

    # Create a blank frame and place resized image at the center
    frame = np.ones((height, width, 3), dtype=np.uint8) * 255
    frame[y_offset:y_offset + zoom_h, x_offset:x_offset + zoom_w] = zoomed_img

    zoom_frames.append(frame)
Another example of arrow transition generated using Python and OpenCV is as shown below.
A similar transition diagonal left to right generated by Python + OpenCV is shown below.
Similarly, a transition in the shape of closing parenthesis ')' can be created as shown below.
Rotate Image in Openshot
description=Aspect_ratio_1 - Name of new profile
frame_rate_num=30000       - Frame rate numerator
frame_rate_den=1000        - Frame rate denominator
width=310                  - Width of the video
height=310                 - Height of the video
progressive=1              - 1 = both even and odd rows of pixels used
sample_aspect_num=1        - Numerator of pixel shape aspect ratio
sample_aspect_den=1        - Denominator of pixel shape aspect ratio
display_aspect_num=16      - Numerator of display aspect ratio
display_aspect_den=9       - Denominator of display aspect ratio
The output shall look like as shown below. Note that when a square a rotated, its corners shall get trimmed as maximum dimensions (the diagonal) exceeds the width of the video.
In order to remove the corner-trimming effect while rotating an image, follow the steps described in image below.
This rotation effectcan also be created using this code in Python and OpenCV.
OpenShot provides options to create 3D animation using Animated Titles menu. It requires another open source program Blender.
Making Corrections in the Videos: if you have misspelt certain words in a video and the frames contain background colour or image, adding the corrected text alone shall overlap with the incorrect text. One method which I use is to go back to the original source which was used to create the frame (for example a PowerPoint slide or Image where text was added manually or Title in an image editing program), create an image of the corrected text (word and/or string) and then overlay this image for the duration that wrong text appears in the video. This can be quickly done in OpenShot. If you have made grammatical errors in narration, not much options exist but to re-record that section.
Machine Learning in Image Data
How to detect if an image has been tampered or not? Same for videos? How to check if a video or image was created using AI/MP application or program? How to find if characters in a video are real?Tips and Tricks on Handling Devices
- If you want to transfer data from one device (say computer) to another device (say mobile or external hard disk), either ZIP the source files or transfer one folder (few files) at a time. Copy-paste function on large number of files (say > 10,000) slows down the data transfer speed.
- In case you want to cut-paste some data, it is safer to use copy-paste and then delete the source data after the file transfer is successful.
- Like in previous case if you want to replace some data, it is safer to rename the destination folder and delete once data transfer is complete. An overwrite operation cannot be corrected (which files were overwritten) if there is any error during the process.
- The Print Screen key does not work when some pop-up or sub-menu window is open in a Program. In Ubuntu Linux, Screenshot application with delay can be used to capture window in such cases. Turn the Screenshot with 5 seconds delay as shown below, click "Take Screenshot" tab, go to the program where a sub-menu needs to be open, wait for set number of seconds for screen to get captured.
Edit epub Files
EPUB files are structurally a compressed (ZIP) file containing XHTML text files, images, and other resources. To unzip the epub to the folder 'eBook': "unzip eBbook.epub -d eBook". To zip up an epub, follow the following steps. Note that the option -r stands for recursive operation and -g is needed to add additional files (grow) to interim zip folder.- zip -X newEbook.epub eBook/mimetype
- zip -rg newEbook.epub eBook/META-INF -x \*.DS_Store
- zip -rg newEbook.epub eBook/OEBPS -x \*.DS_Store
Calibre
This package can be used to view, edit and convert ePUB files. The Calibre install provides the command ebook-convert that runs from command line and there's no need to run Calibre. For example: "ebook-convert eBook.epub eBook.pdf --enable-heuristics" can be used to convert a EPUB file to PDF. Multi-column PDFs are not supported and this command line operation shall not work, only way left is to edit the PDF in GUI mode.
MoviePy Functions Tested in Ubuntu 20.04 LTS

MoviePy as described earlier is a wrapper around FFmpeg to edit videos and audios. This file contains few functions which can be used to create freezing frame effects and trim unwanted frames from videos. This code can be used to add text to a blank video. Attempts were made to improvise the example scripts available in the official documentation, many of them did not work and the error were too cryptic to debug.
This code to create End Effect is adapted from example scripts provided in documentation.
 FAQ: OpenShot
Q01: How are the effects created?
A01: Effects are created by combination of following attributes or features: location, position, rotation, scale, scale X, scale Y, shear X, shear Y, brightness, Transparency...
Q02: How can a video be masked?
A02: A video mask is create using Alpha or Transparency value of the video clip and that of the mask object
Q03: How can a text be added to a video?
A03: A text is added using Title options in OpenShot. Title may look to have black background but it is a transparent background. Any image can be used to change the background colour of the title. Also, there is an option to use title of type "Solid Color" and the background can be selected to any pre-defined colours.
Q04: How can a horizontal or vertical line be drawn?
A04: Use a title of solid colour -> change Scale Y to 0.05 for horizontal line or Scale X to 0.05 for vertical line.
Q05: Can a scrolling text be added to a video?
A05: Yes, a scrolling text [or an image with required text] from left-to-right or right-to-left can be added using a text box and changing the position of the text box from extreme right [at start of the video or at any time frame after start] to extreme left [at end of video or any time frame before the end].
Q06: Can the typewriter effect be created in OpenShot?
A006: No as on version 3.1.1. A more tedious and even impractical way it to create title for each character.
Q07: How can one type in non-Roman script say Devanagari (Hindi)?
A07: Using 'Advance' editor. You need to get the text in desired script from other sources such as Google Translate. Copy paste that non-Roman script inside the Inkscape window which open once you click on "Use Advance Editor".
Q08: Can a screen pump (temporary zoom-in) effect be created?
A08: Yes, you just need to adjust the scale value near the time frame you want to create Zoon-in effect.
Q09: Can the Camera Flash effect be created in OpenShot?
A09: Yes, use transparency (alpha) value of the clip.
Q10: Can a video or image be mirrored in OpenShot?
A10: Yes, use scale X = -1 to flip or mirror the video in horizontal direction and scale Y = -1 for vertical direction
Q11: Can a video play behind an image?
A11: Yes, set transparency (alpha) value of the image to < 1 typically in the range 0.4 ~ 0.5
Q12: Can a video be played faster or slower?
A12: Yes, right click on the clip -> Time -> Slow -> Forward -> 1/2X or 1/4X or 1/8X or 1/16X. Note that the overall duration of video is increased in same proportion.
Q13: How can the Paint Effect of Character Introduction effect be created in OpenShot?
A13: Split the clip at desired time, Right click on the clip -> Time -> Freeze or Freeze and Zoom. Note that the duration of the clip is increased by Freeze time selected.
 Video Editing using Blender
Adding Effects & Transitions: To add an effect strip, select one base strip (image, movie, or scene) by clicking MB1 on it. For some effects, like the Cross transition effect, use Shift-LMB to select a second overlapping strip. From 'Add' menu pick the effect to be created and the 'Effect' strip will be shown above the source strips.
In the video strips, strip name, path to source file, and strip length are shown. For image strips, the strip length is fixed to 1.
Alpha Over: With Alpha Over, the strips are layered up in the order selected; the first strip selected is the background, and the second one goes over the first one selected. The Opacity controls the transparency of the foreground, i.e. Opacity of 0.0; will only show the background, and an Opacity of 1.0 will completely override the background with the foreground. Alpha Under: the first strip selected is the foreground, and the second one, the background.
Creating a Slow-Motion Effect: To slow strip down the video clip without affecting the overall frame rate, select the clip and Add > Effect > Speed Control effect strip.
Wipe Strip: The Wipe transition strip is used to transition from one strip to the next: duration of the wipe is the intersection of the two source strips and cannot be adjusted. To adjust the start and end of the wipe, temporal bounds of the source strips should be adjusted in a way that alters their intersection.
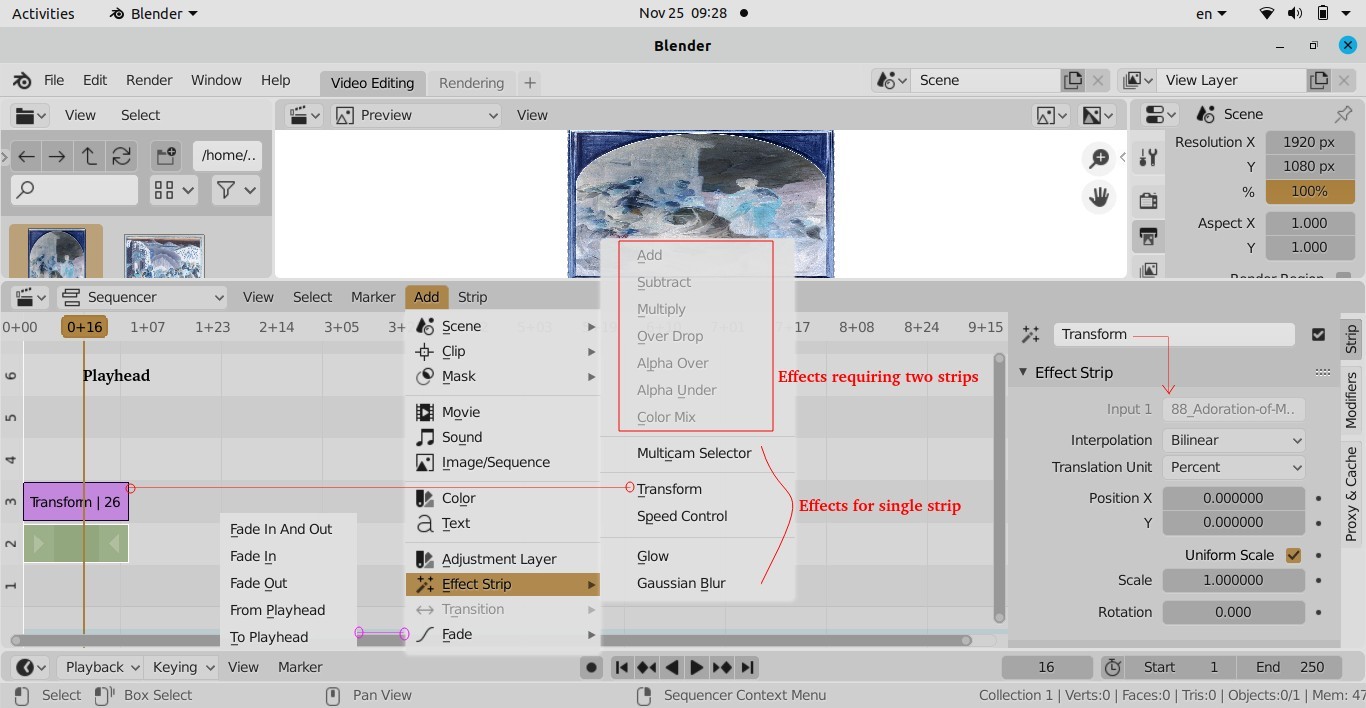
Other products offering similar features are Maya 3D and Houdini. From the website of Autodesk: "What is Maya? Maya is professional 3D software for creating realistic characters and blockbuster-worthy effects. Bring believable characters to life with engaging animation tools. Shape 3D objects and scenes with intuitive modelling tools. Create realistic effects – from explosions to cloth simulation." From the official page of Houdini: "Houdini is built from the ground up to be a procedural system that empowers artists to work freely, create multiple iterations and rapidly share workflows with colleagues. In Houdini, every action is stored in a node. These nodes are then “wired” into networks which define a “recipe” that can be tweaked to refine the outcome then repeated to create similar yet unique results. The ability for nodes to be saved and to pass information, in the form of attributes, down the chain is what gives Houdini its procedural nature." ANSYS Discovery has on option called Vectorize Image that creates curves around colored areas in images.
PowerBI and Pivot Tables
Excerpt from Microsoft website about PowerBI: Find insights in your data and share rich analytics reports. Explore your reports to find and generate the quick insights you need for better business decisions. Collaborate on reports with colleagues, then easily share reports and insights in workspaces, on the web, in apps, via Microsoft Teams.How to Create a Pivot Table
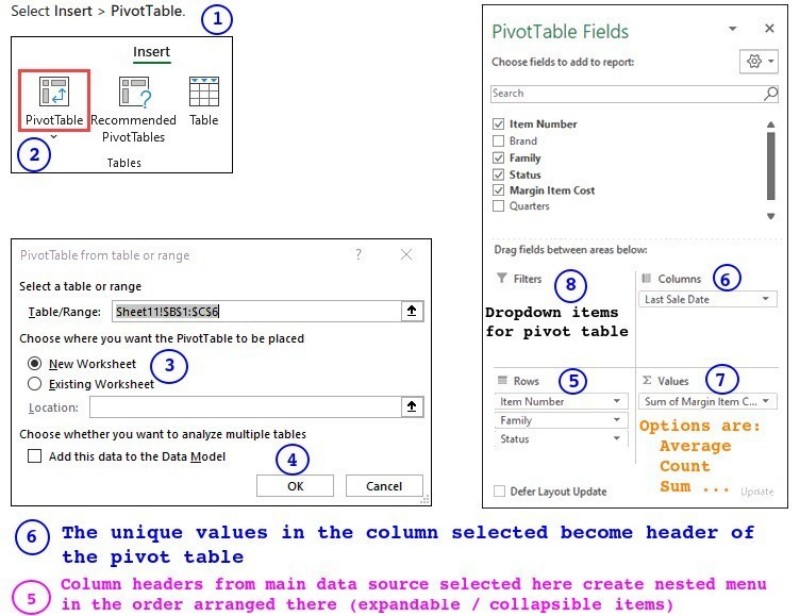
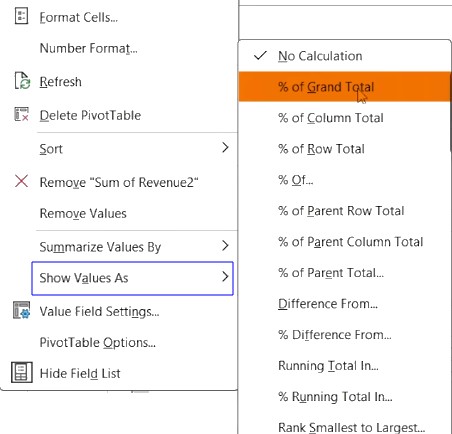

The content on CFDyna.com is being constantly refined and improvised with on-the-job experience, testing, and training. Examples might be simplified to improve insight into the physics and basic understanding. Linked pages, articles, references, and examples are constantly reviewed to reduce errors, but we cannot warrant full correctness of all content.
Template by OS Templates